Total
Thank you for the purchase. We hope you love our theme!If you find any bugs with this theme get in touch with a clear
description of the problem so we can fix it. However we do not support
modifications such as: changing the appearance or functionality of the theme.
IMPORTANT - ONLINE DOCS!!!
Please have a look at the ONLINE DOCUMENTATION files, they are constantly updated and kept current. The documentation below may be outdated and simplified. Online you will find extended docs, snippets, videos and more!
Requirements
The following things are required to run this product:
- PHP 5+
- MySQL 5+
- GD Library
- Self-Hosted WordPress 3.7x
- Legal theme download
- Experience using WordPress functions
Recommended
This theme supports the following external plugins to provide functionality:
- Managed WP Hosting: WPEngine
- Forms: Contact Form 7
- Sidebar Management: WooSidebars
- SEO: WordPress SEO
Index
- Installation
- Sample Data (Dummy Content)
- Theme Options Panel
- Main Menu Setup
- Local Scroll Menu
- Building Pages + Visual Composer
- Adding Sliders To The Top of Pages
- Built-in Editor Styles
- Blog
- Portfolio, Staff & Testimonials
- Widgets & Sidebars
- Contact Form
- Font Icon Shortcode
- Custom Login Page
- Custom 404 Page
- Common Issues Debugged
Installation
You'll want to install this theme just like any other WordPress theme, either by uploading the main theme folder via FTP (unzipped) or the zipped file via the Wordpress theme upload section. Make sure you located the main theme folder from the downloaded zip file and that you are not uploading the entire zip with all the documentation, sample data, etc. Watch the
1. Uploading The Theme
a. FTP Method
- Log into your site via FTP
- Browse to your folder located at wp-content/themes
- Unzip the Total.zip folder and upload only the extracted Total folder to your server
- Log Into Wordpress and go to Appearance → Themes
- Find the theme and click to activate

b. WordPress Method
- Log into ThemeForest and click on the "Downloads" tab
- Locate the Total theme and click the download button next to it
- Select the "Installable WordPress Theme" link from the dropdown.
- You should now have a file called Total.zip
- Log into WordPress
- Browse to Appearance →Themes
- Click to "add new" and then follow the instructions on the screen
- When it asks to select a file find the zipped Total.zip file you downloaded previously

3. Recommended Plugins
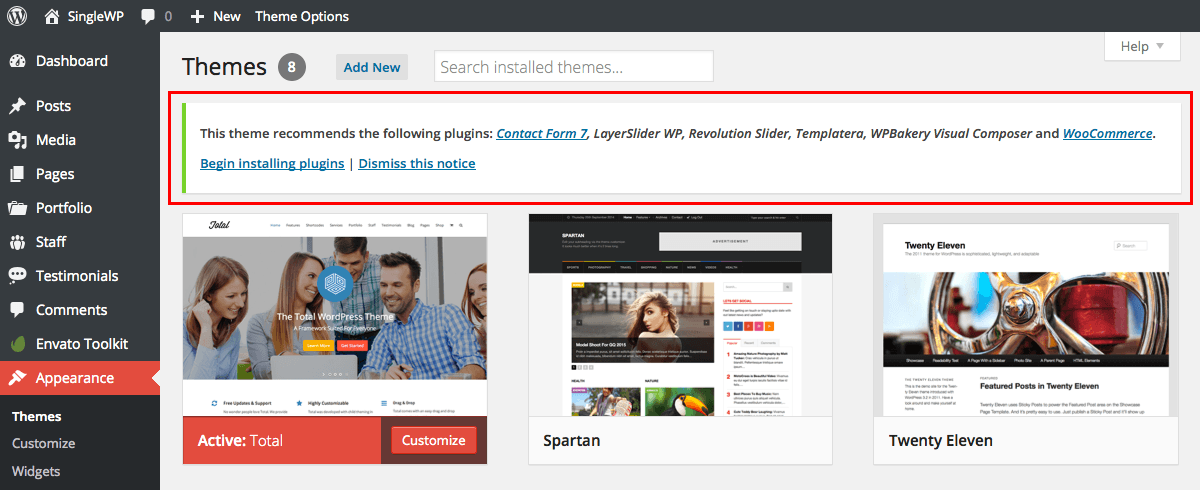
After you have finished installing the theme you will see a yellow notice stating you should install the recommended plugins, the theme will run without them but functionality will be impaired. We suggest you activate them to receive full benefits of the theme.
4. Activate & Save Permalinks - Important!
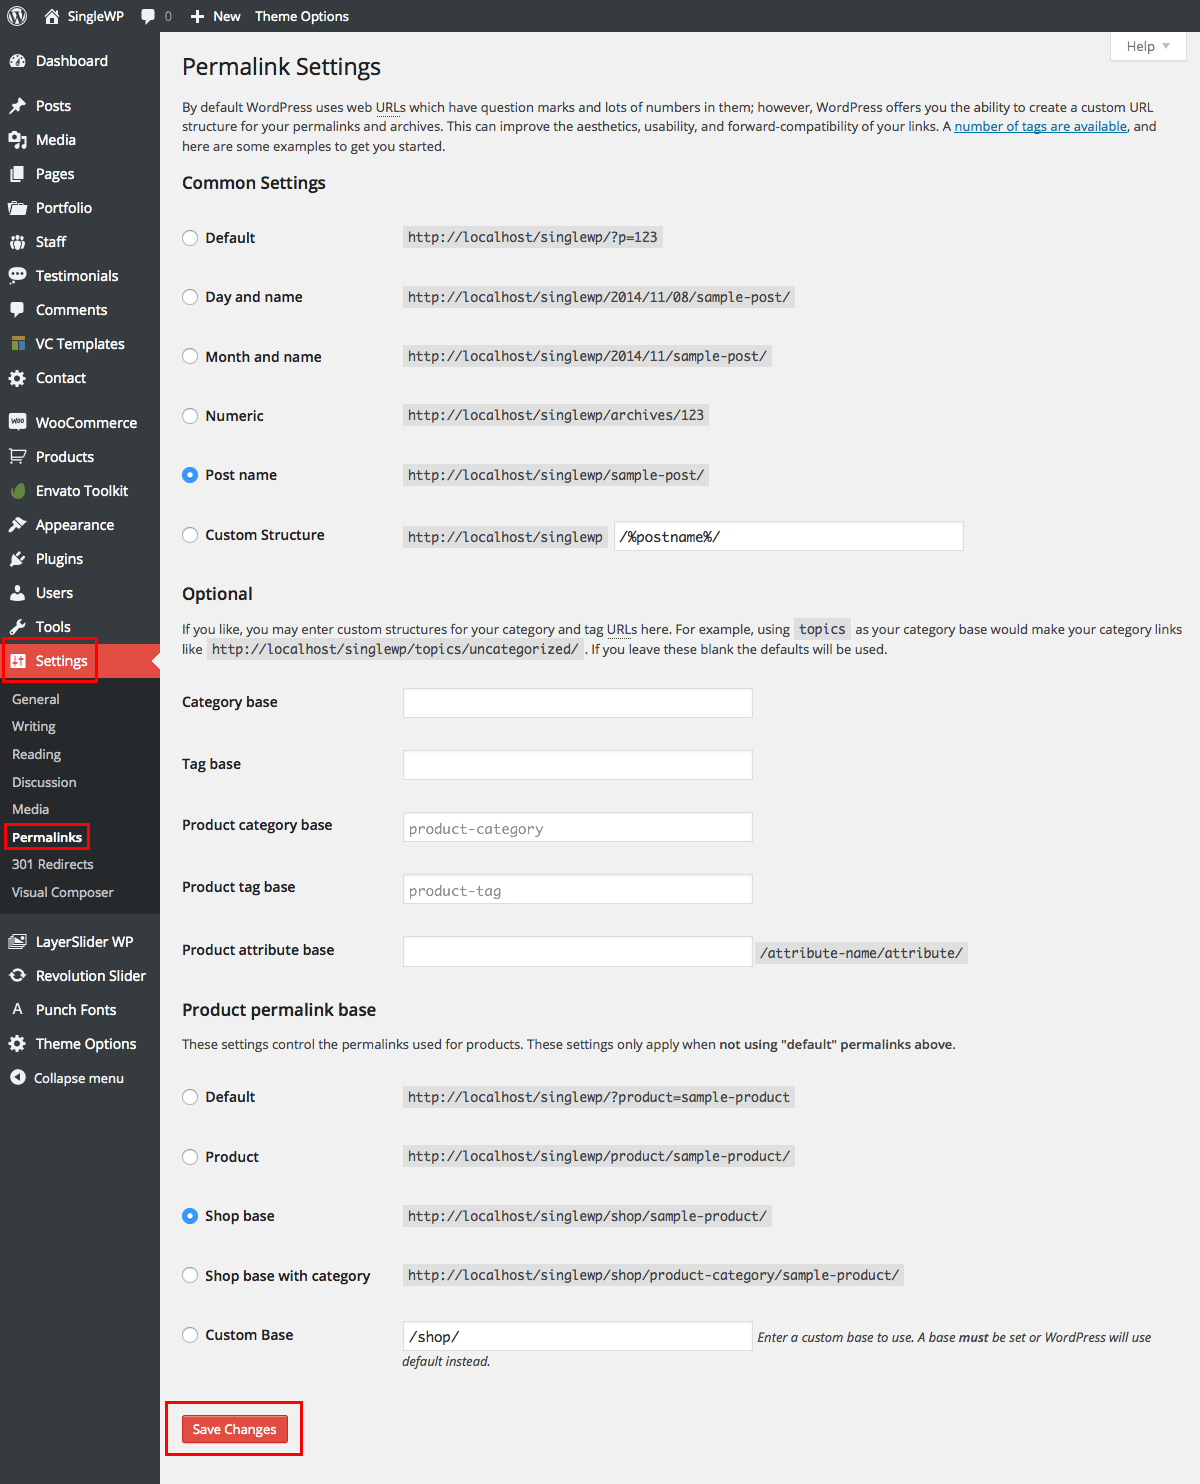
After installing and activating the recommended plugins go to your Settings → Permalink settings and hit the save button. To prevent any 404 errors on custom post type pages.
Sample Data
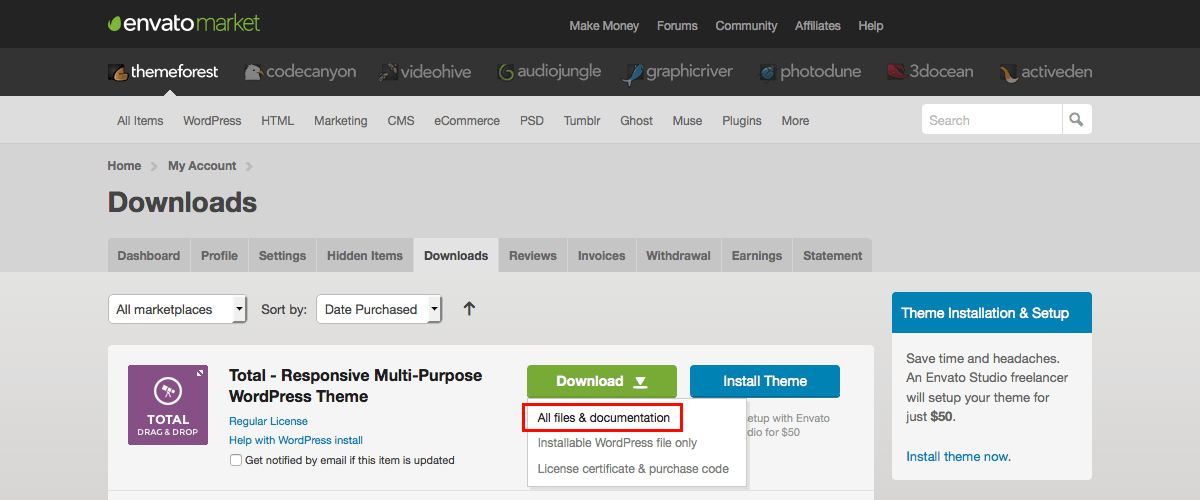
- Sample Data isn't automatically added to your site, for most people this wouldn't be beneficial, instead there are specific files included to import sample data. The first step is to download the All files & documentation file from Themeforest. This option is for a zipped package that includes the installable theme, licensing information, a child theme example, psd information and the full sample data xml file.
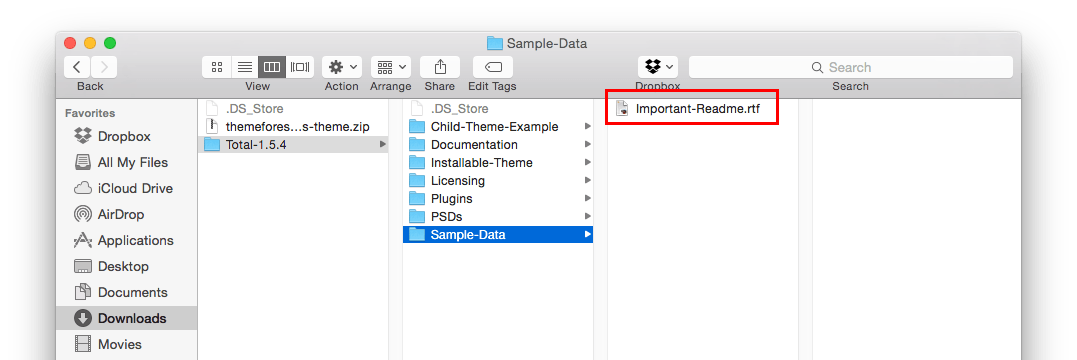
- Extract the downloaded file and open it. You should see a folder named Sample-Data. Open it and click on the Important-Readme file to find instructions on downloading the sample data xml file.
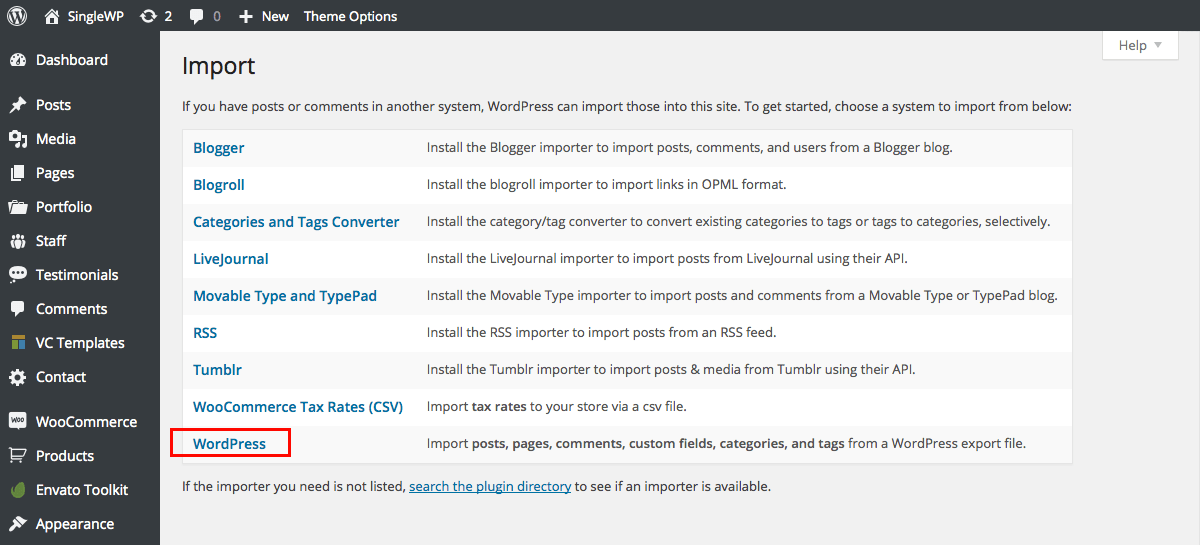
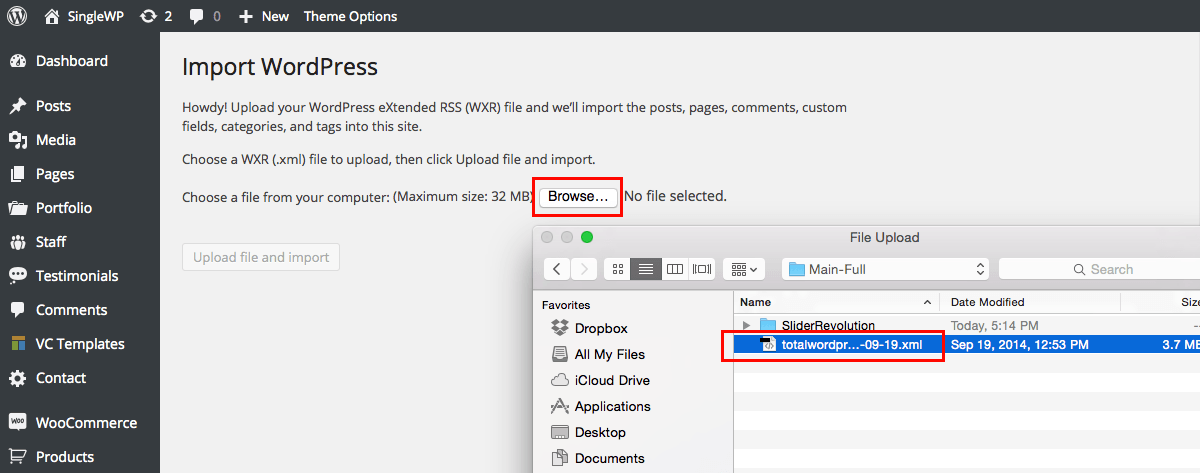
- Once you have downloaded the xml file, extract it to find the sample data for our full main demo, the revolution sliders, and our niche demo sites. Next log into your WordPress website and navigate to Tools > Import.
- Click on the WordPress option If you haven’t already, you will be prompted to install the WordPress Importer free WordPress plugin. Just install it like you would any other plugin, and after you activate it return to this screen.
- Then click the Browse button to select the xml sample data file you would like to upload, and click Upload file and import. Next Your should see the following screen.
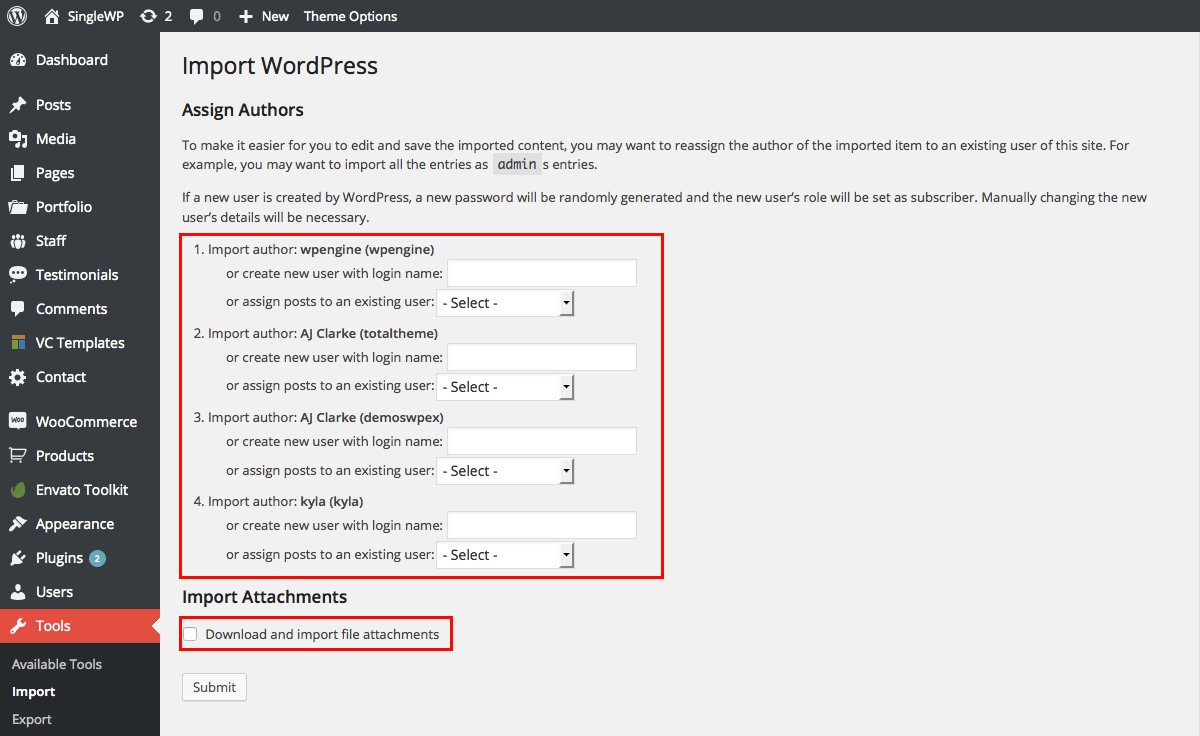
- The importer will give you the option to either import our demo users, or to assign the posts to an existing user on your WordPress site. For each option we recommend that you assign the posts to an existing user (ideally your user account, since you are the one working on the website). You’ll also see an option to import file attachments. Check this box only if you want to import all of the image and media files included in our Total demo. Click submit to import the sample data. Once complete you should see a successful import message.
- There are certain things a WP import can not do, so after uploading sample data:
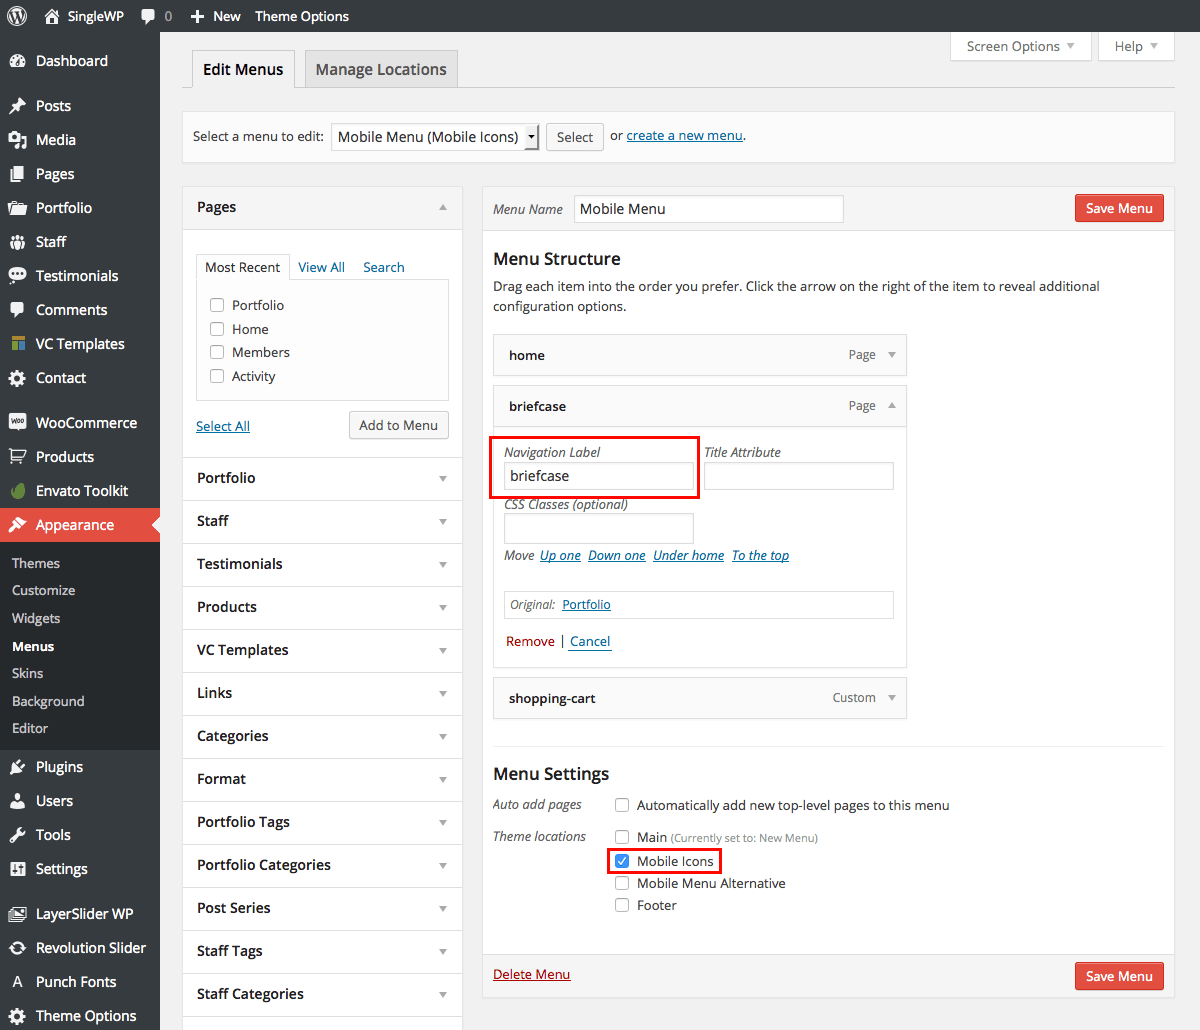
- Go to Appearance->Menu to set your menu locations.
- Go to Appearance->Widgets to add your widgets (widgets aren’t included in a WordPress export)
- Set your homepage at Settings->Reading using the “Home” page as a static page.
- Go to the Customizer setup your main options!


Sample Sliders
In our demo we exclusively use the Revolution Slider (although the Layer Slider plugin is also included in our theme package). So first, make sure that you have installed and activated the Revolution Slider recommended plugin.
We have included the slider sample data in the same location as the other sample data files (so follow the same steps listed for importing the full sample data: download the all files zip, extract the folder, open the Sample-Data folder, and click on the Important-Readme file for direction to download the sample data).
Once you’ve downloaded the sample data zip, extract the folder and go to Main-Full > SliderRevolution to locate all of our sample sliders.

To import the sliders, log into your WordPress website and go to the Revolution Slider. Click on the green button to Import Slider.
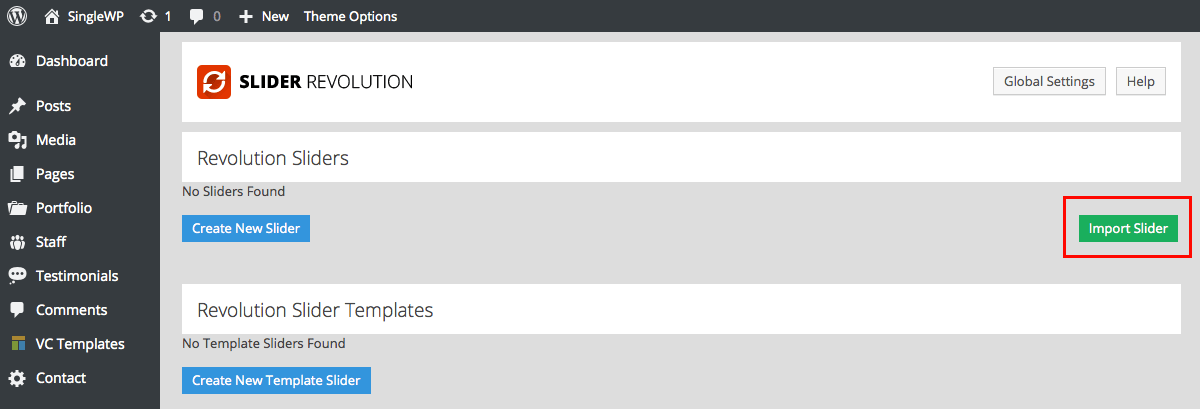
Browse for the slider you would like to import, then choose if you would like to overwrite or append your current animations and styles. If you have made any changes to your Revolution Slider animations or styling options then we strongly recommend you choose the append option in order to maintain your custom settings and to import any included in the slider you’re importing. After you click to Import Slider you should see the new slider listed.

Theme Options
The Total WordPress theme includes tons of easy to use options to customize the design of your site. Most of your theme options can be found in the live WordPress theme customizer. Total uses only native WordPress functions, os you should be familiar with the way the Customizer looks and works.
Simply navigate to Appearance > Customize to make changes to the design of your website.

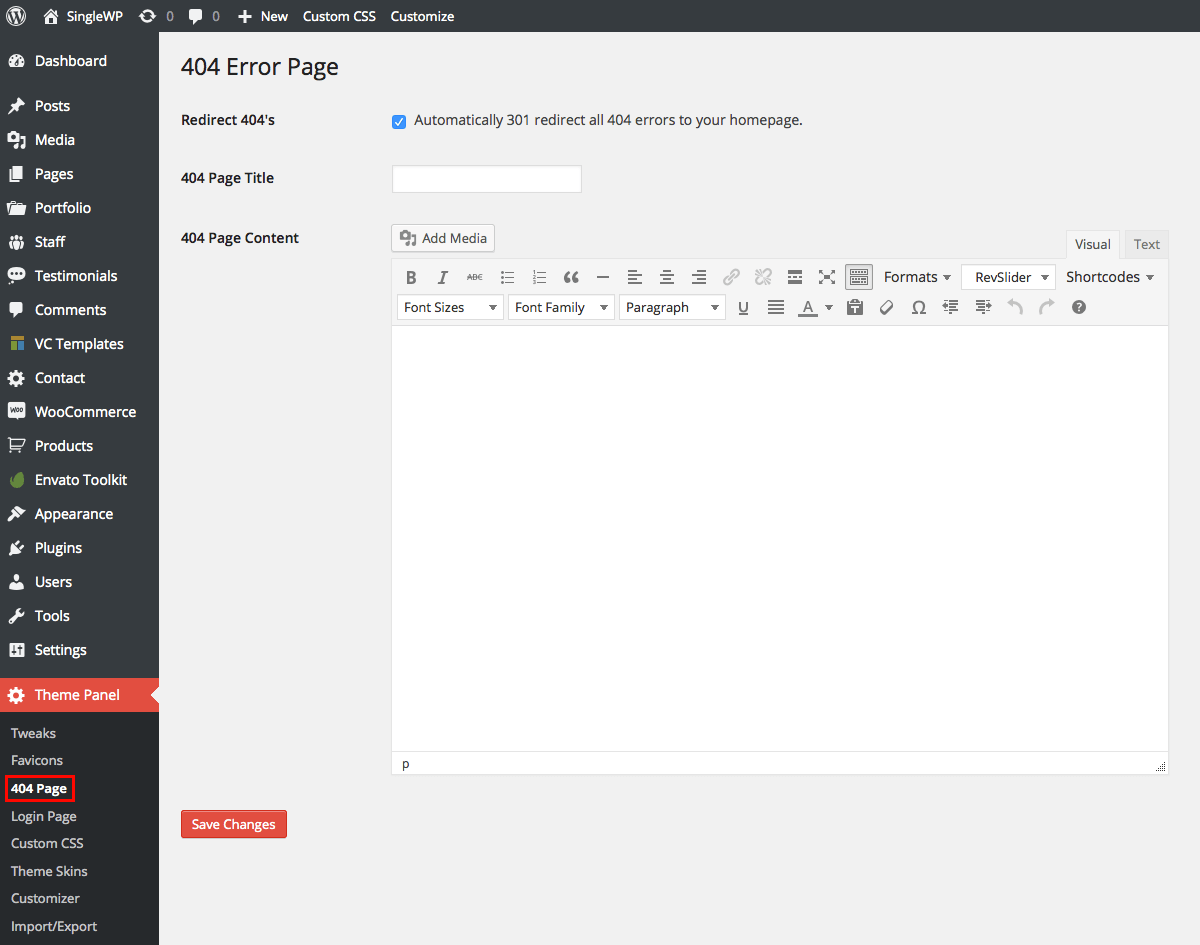
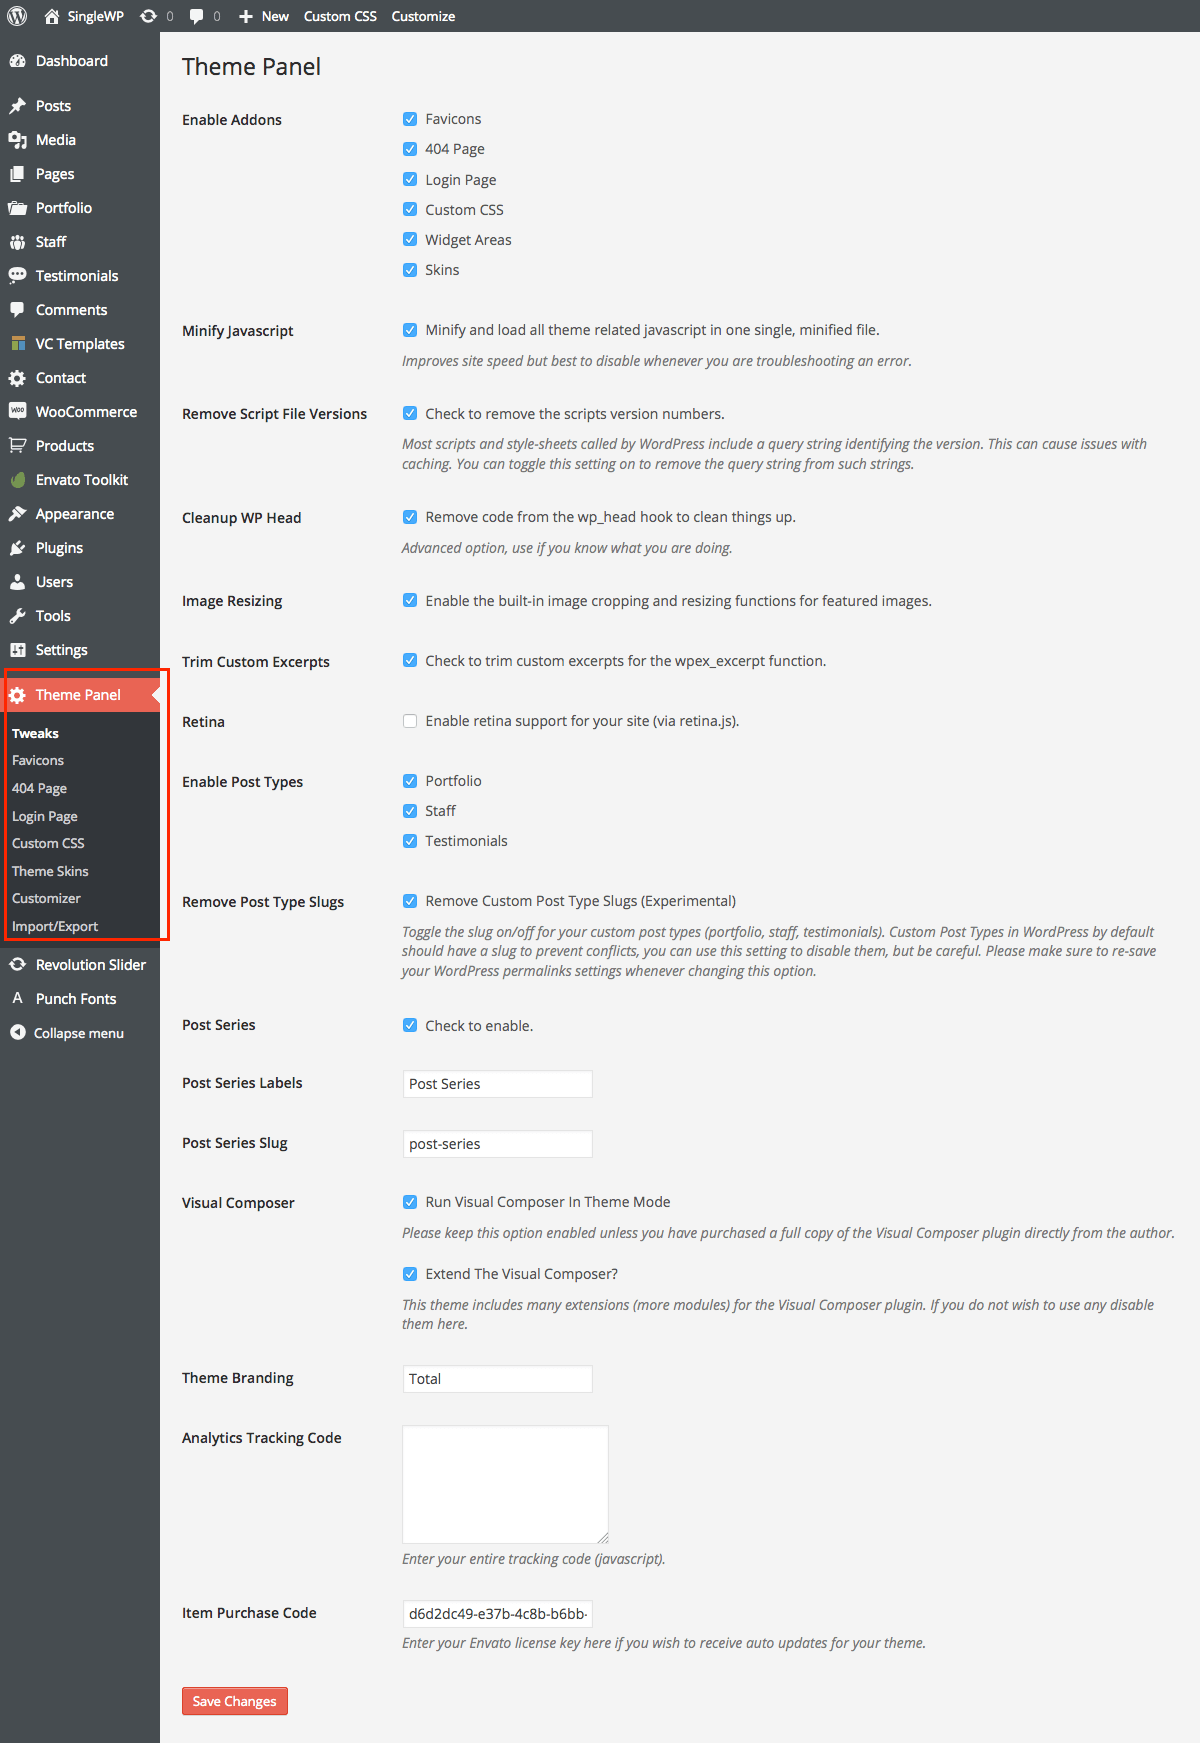
There are more theme options under the Theme Panel. This is where you will find tweaks, favicons, 404 page options, login page options, theme skins and a custom CSS field.
Building Pages + Visual Composer
This theme includes support for the Visual Composer plugin plus an additional plugin called "Visual Composer Extension" created specifically for our clients. The Visual Composer plugin and extension add a ton of drag and drop modules to your dashboard for quickly and easily building your site.
Make Sure Visual Composer Is Active
Make sure you have activated the Visual Composer plugin. This plugin is NOT built-into the theme (for good reasons) so it must be installed and activated. After installing the theme you should have been prompted to install the recommended plugins. If you chose not to install the Visual Composer then now is the time to do so.

Visual Composer Settings
Go to Settings > Visual Composer to setup the plugin. The most important part is to enable the composer for the post types you want to use it on.
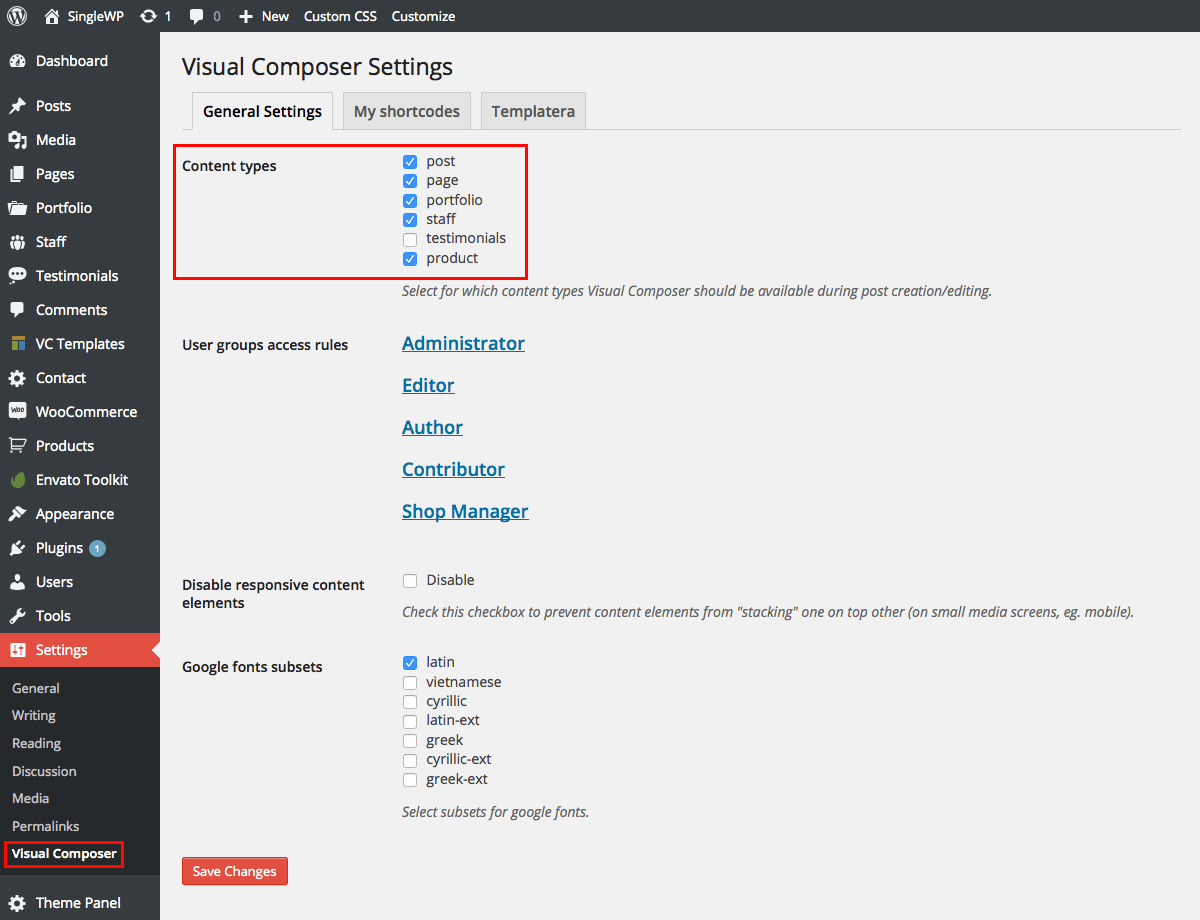
Using The Visual Composer
The Visual Composer is very easy and doesn’t really need much explanation, have a look at the screenshots below for a quick guide (you can also view this more comprehensive Visual Composer guide).
First, decide if you would like to use the Backend or Frontend editor and click the related button.

Visual Composer Backend Editor
The backend editor includes easy to use options to add page elements or select page templates.
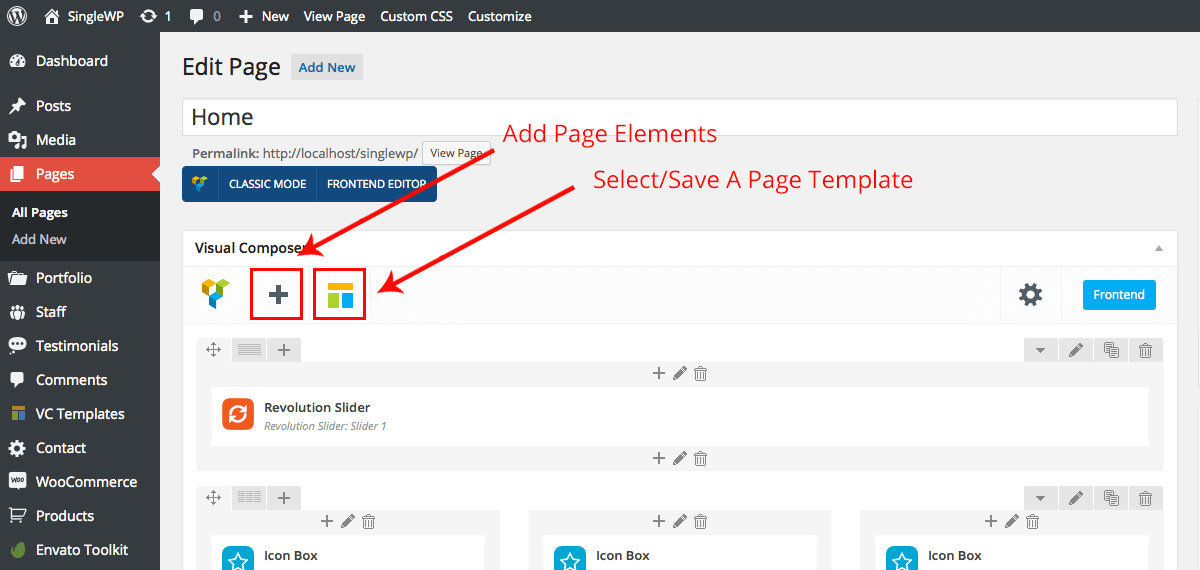
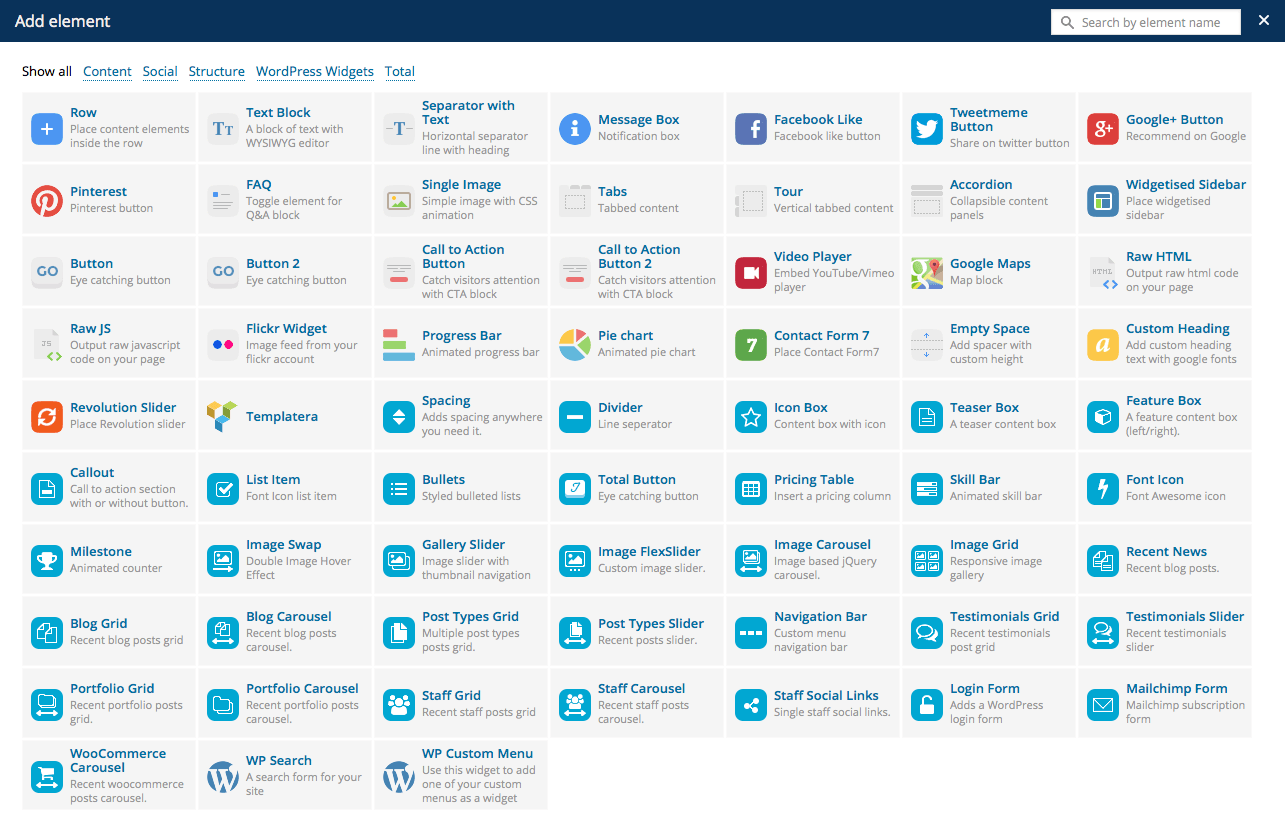
If you click on the + symbol the Visual Composer will open a window to add elements. Here you will find all of the Visual Composer and Total page building modules. To add a page element simply click on it.
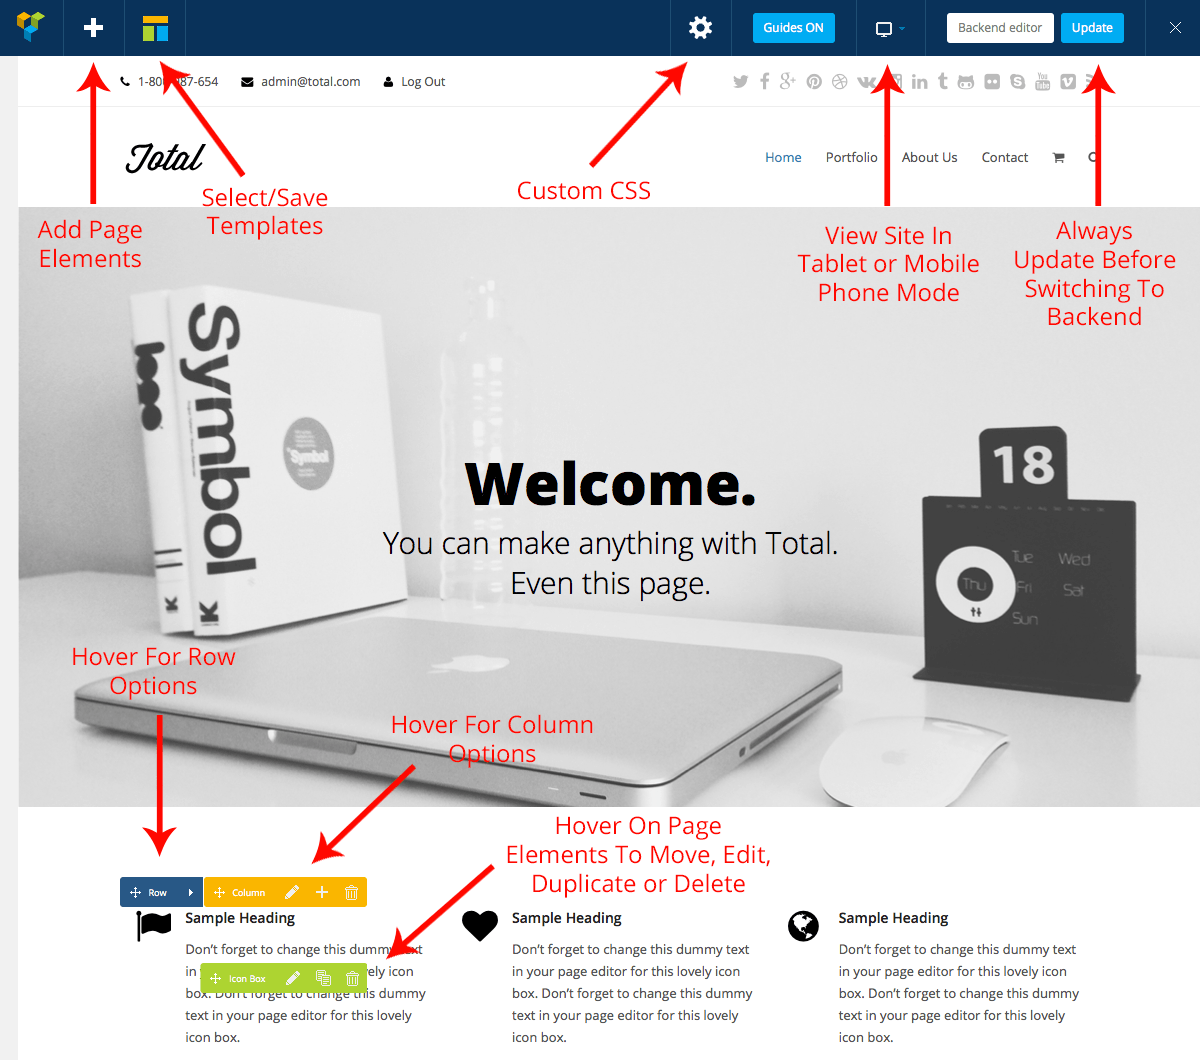
Use the page element options to customize your page. Each element has different options for customizations like colors, fonts, margin, images and more. Below is a map of the backend editor with helpful pointers for the editor options. After adding elements make sure to save your page.

Visual Composer Frontend Editor
The frontend Visual Composer includes all of the same page building options as the backend. The only difference is that you can see the actual page elements as you insert theme instead of place holders.
Creating Full-Width Background Areas
The Visual Composer is very easy to use and pretty much the only thing that might confuse people is on how to create a full-background area. But don’t worry it’s simple!
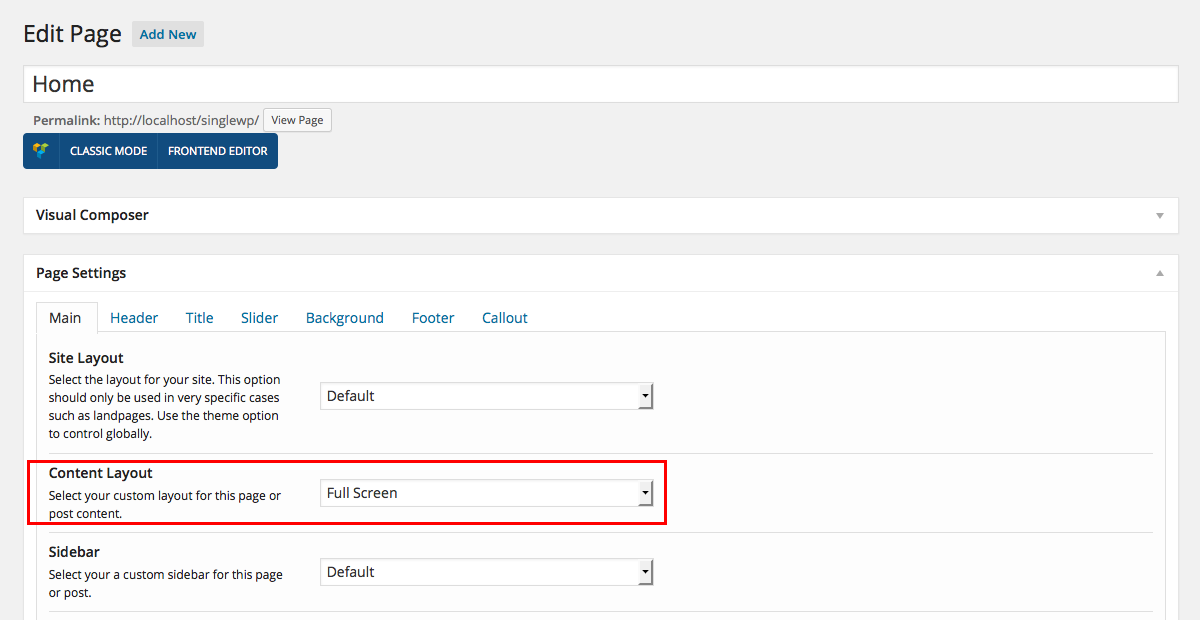
Step 1: Set your page or post to have the full screen layout
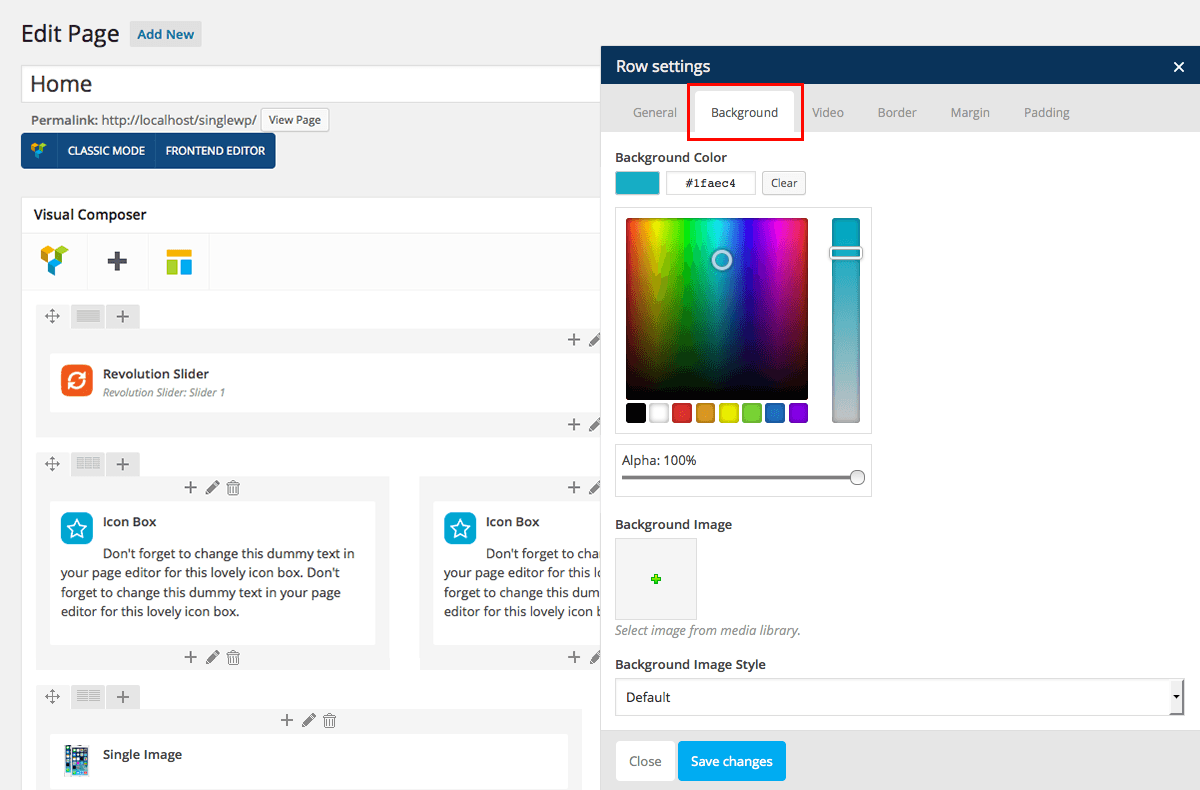
 Step 2: Edit the Row you want to give a background to.
 Step 3: Go to the Background tab to choose a color with the built-in color picker, or upload an image to use as your background.
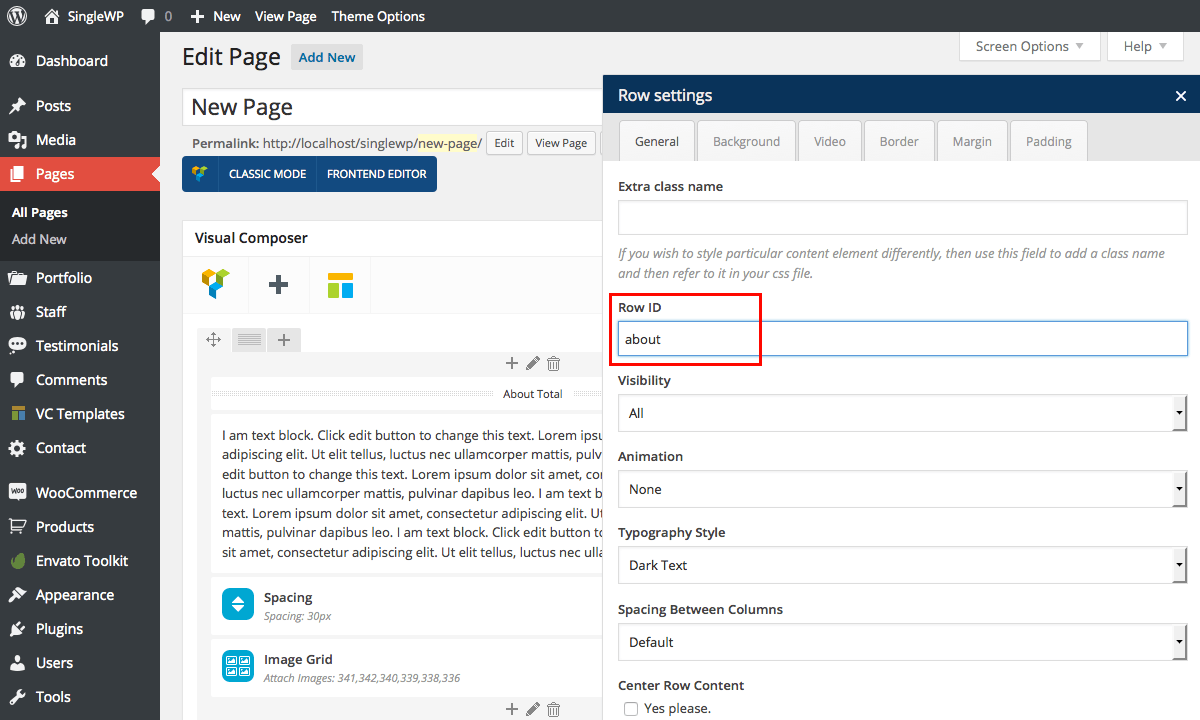
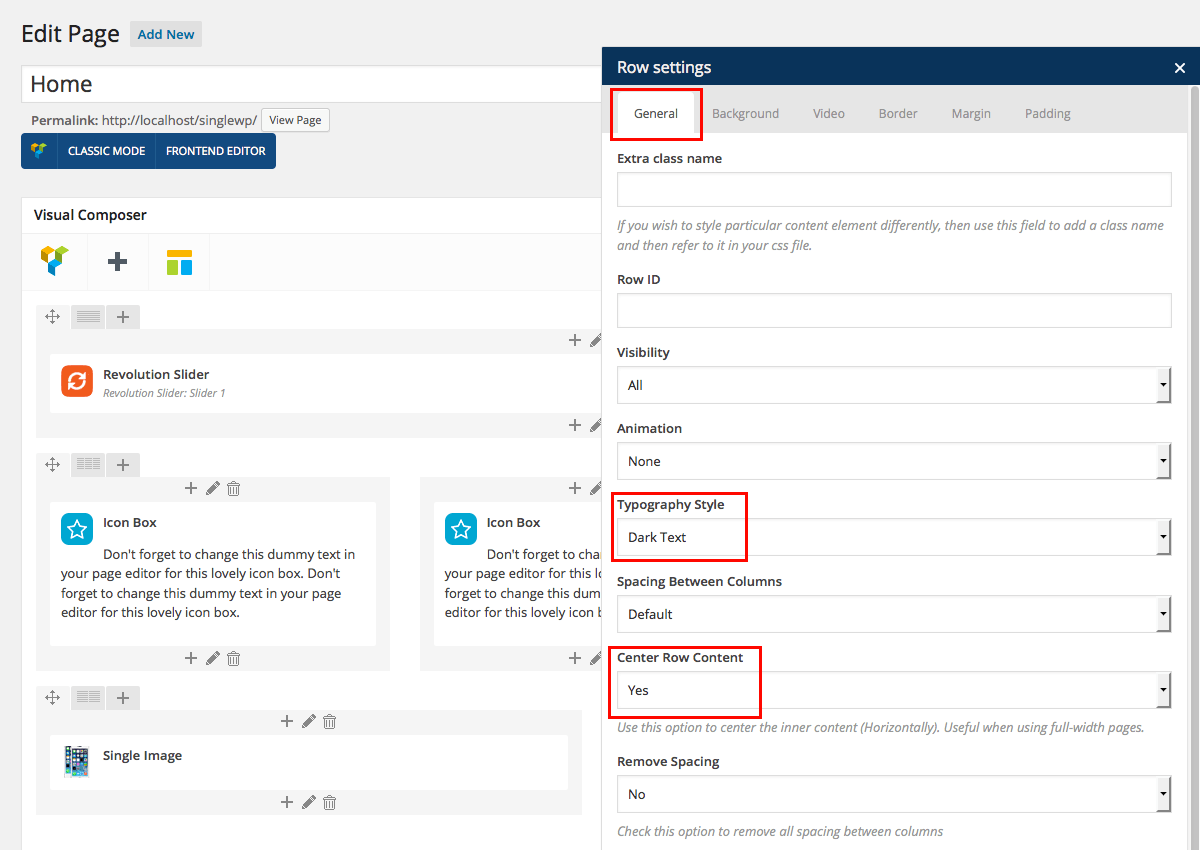
 Step 4: Go to the General option tab. Select the row option to center inner content. Be sure to check this box to center your content if you want to add modules within your full-width background area.
Adding Sliders To The Top of Pages
This theme includes LayerSlider which you can use to quickly add amazing sliders to the top of your pages/posts.
Make sure LayerSlider is enabled
First make sure the LayerSlider plugin is active, it should have auto activated upon theme installation. If not you can find it in your downloadable zip in the plugins folder.
Importing Sliders
You can import the sliders from the demo, these are located in the sample data folder when you download the All files & documentation option from Themeforest.
Creating Sliders
Creating Sliders is pretty self-explanatory, everything in the dashboard is well labeled, you shouldn't have any problem figuring it out. But if you do want some help getting started with the Revolution Slider, checkout our how to guide.

Adding Buttons To Revolution Sliders
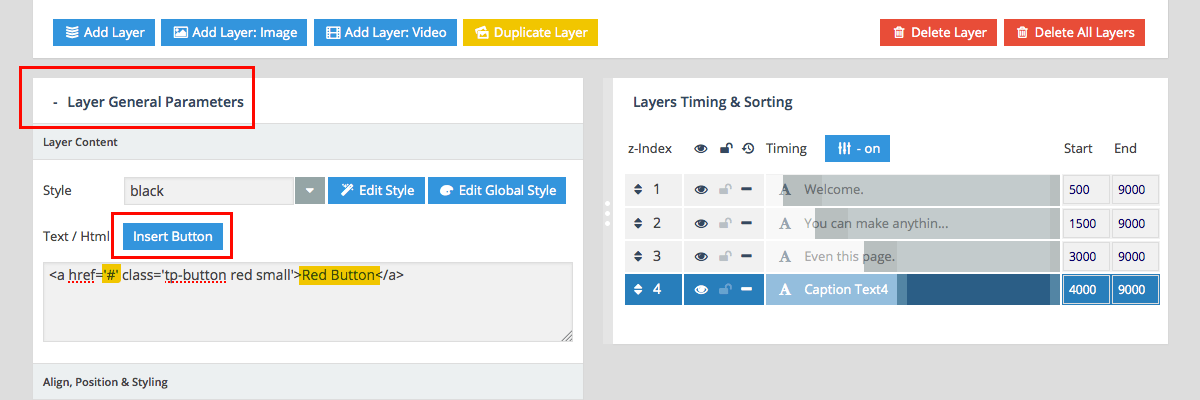
The easiest way to add a button to a Revolution Slider is to create one using the built-in Layer General Parameter.
Revolution Slider Method 1: First add a new layer. Then in the Layer General Parameters click the options to Insert Button. Select the button typer you would like to add. This will add the basic code you need for your button. Just replace the # with your URL, and the Red Button placeholder with the text you want to use for your button.
Revolution Slider Method 2: Your second option is to create a button from scratch using a custom layer content style. We only recommend this method if you are somewhat comfortable with CSS since you will have to make some tweaks on your own. To do this add a new layer and type in the code for your text with a link. Because you are adding a link, the default link styling will be added. To remove this add

Adding Buttons To Layer Sliders
To add a button to a Layer Slider you can simply use the built-in classes.
Step 1: First add a new layer and type your button name in the Content tab. Next add the URL you want your button to go to in the Link tab. Step 2: Then add the classname color-button in the Attributes tab, followed by a color. This is also where you should add your link title. You can find the list of colors and their styling below the screenshot.

a.color-button.grey{ background-color: #bbb; }
a.color-button.black { background-color: #333; }
a.color-button.blue { background-color: #3f90bd; }
a.color-button.orange { background-color: #ff6040; }
a.color-button.orange { background-color: #ff6040; }
a.color-button.gold { background-color: #ffaa33; }
a.color-button.green { background-color: #87bf17; }
a.color-button.purple { background-color: #a73df2; }
a.color-button.teal { background-color: #00b3b3; }
a.color-button.pink { background-color: #f261c2; }
a.color-button.brown { background-color: #804b35; }
a.color-button.red { background-color: #F73936; }
a.color-button.rosy { background-color: #EA2487; }
a.color-button.white { background-color: #fff; color: #444; }
Adding Sliders To Pages
There are 2 ways you can add sliders to the top of your Pages.
Method 1: Add the slider shortcode inside a Visual Composer module at the top of your custom page or post. Just add a Revolution Slider module as the first page element and select the slider you would like to use.

Method 2: Add the slider shortcode inside the Page Settings. Just click on the Slider tab and paste in your slider shortcode. With this method you can also change your settings for the slider position (default, below title, above title, above menu, above header, above top bar), slider bottom margin, and slider mobile alternatives. This a great feature that you can use to hide your slider on mobile devices, and display a more legible image or text instead.

Editor Styles
In this theme we have enabled some additional options in your post editor which we think are really useful.
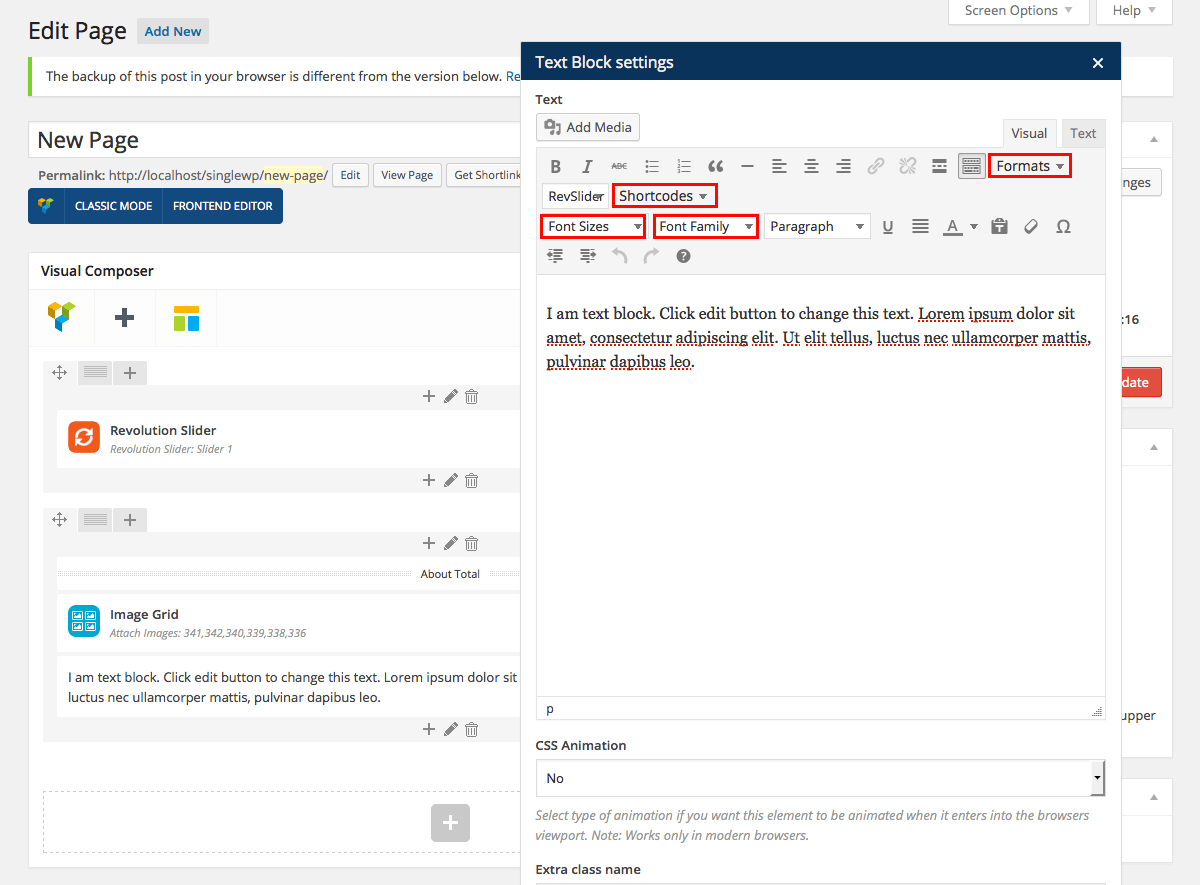
- Formats: Total Styles for text highlights, thin font & white text, plus color buttons
- Shortcodes: Add icons, a WPML language switcher, a PolyLang switcher, simple button, divider, spacing, staff social links or a shortcode for the current year
- Font Sizes: Custom font size options (e.g. 9px, 10px, 12px, 14px, 16px, 18px etc.)
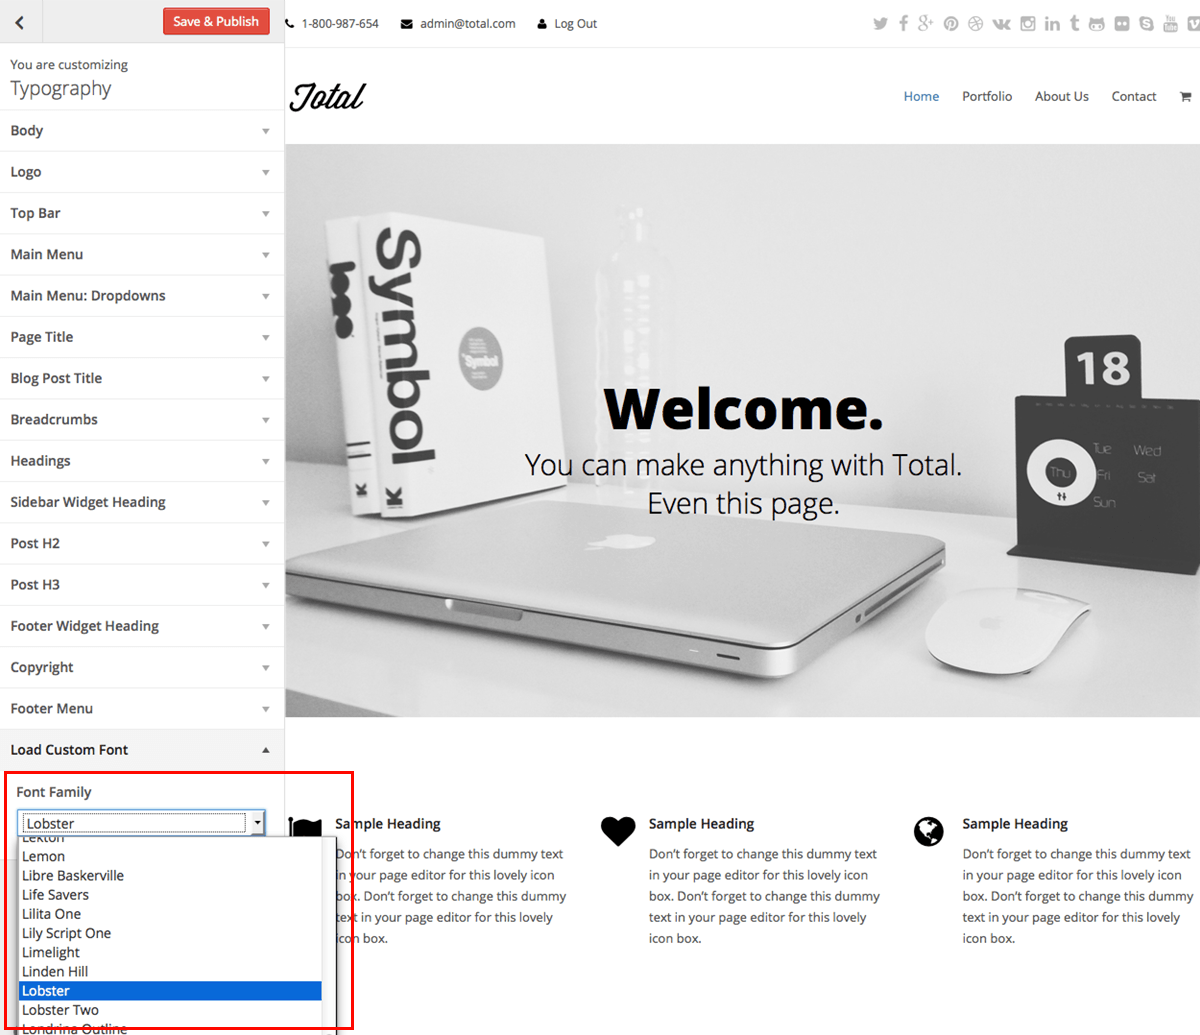
- Font Family: Select a different font family for your text. If you would like to add a new font family to this dropdown, go to the theme Customizer and select the Typography tab. Here you will find an option to Load Custom Fonts. Just select your font from the dropdown and save.
Blog
This theme includes support for a standard style blog.
Blog Template
If you are using the homepage as a static page you can create your blog page using the included blog template. Simply create a new page and under the Page Attributes section select the Blog template. Then publish your page. Now all you have to do is add blog posts and customize your blog using the Blog options in the Customizer.

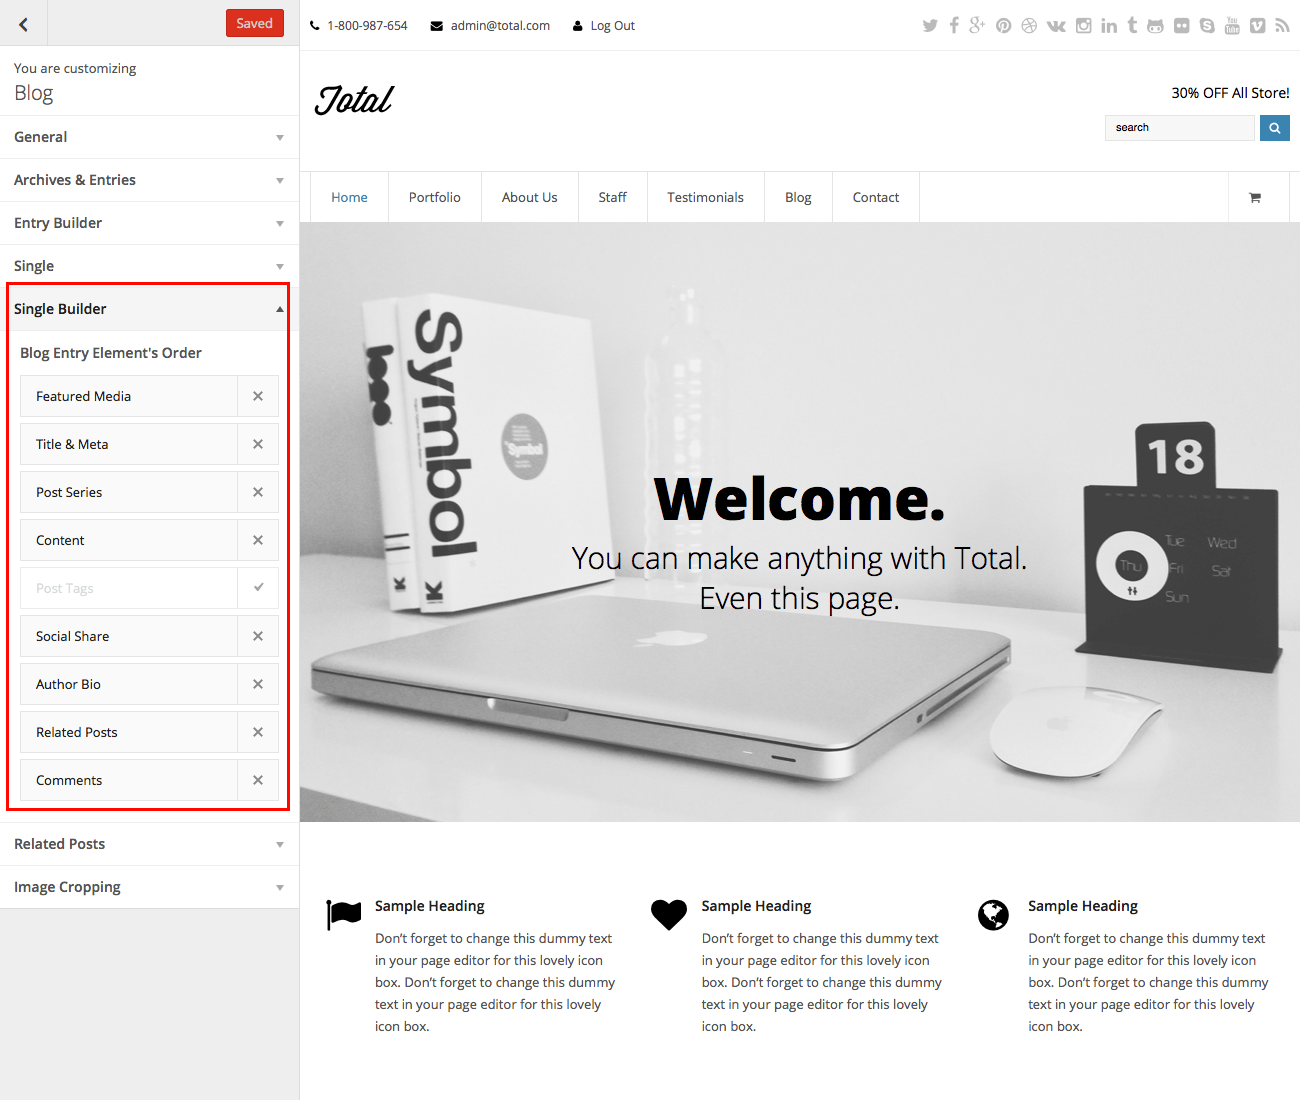
Single Post Builder
To change the layout of your blog post you can use the Single Builder option in the WordPress Customizer. Use the options to enable, disable, drag and drop single entry post elements.
Post Slider
To create sliders for your posts simply use the Gallery post format and select your images with the built-in image gallery metabox.

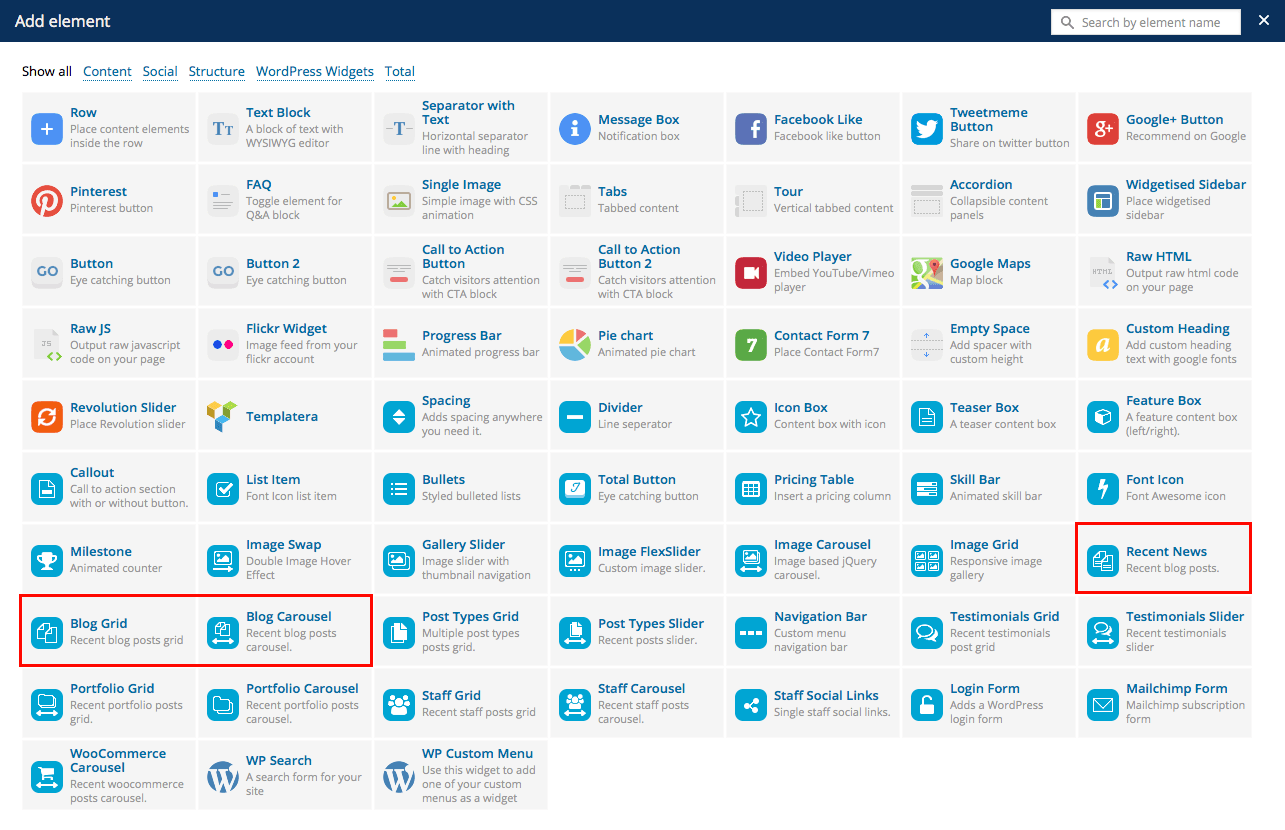
Displaying Blog Entries On Any Page
Use the Visual Composer to insert Blog items anywhere you want!
Portfolio, Staff & Testimonials
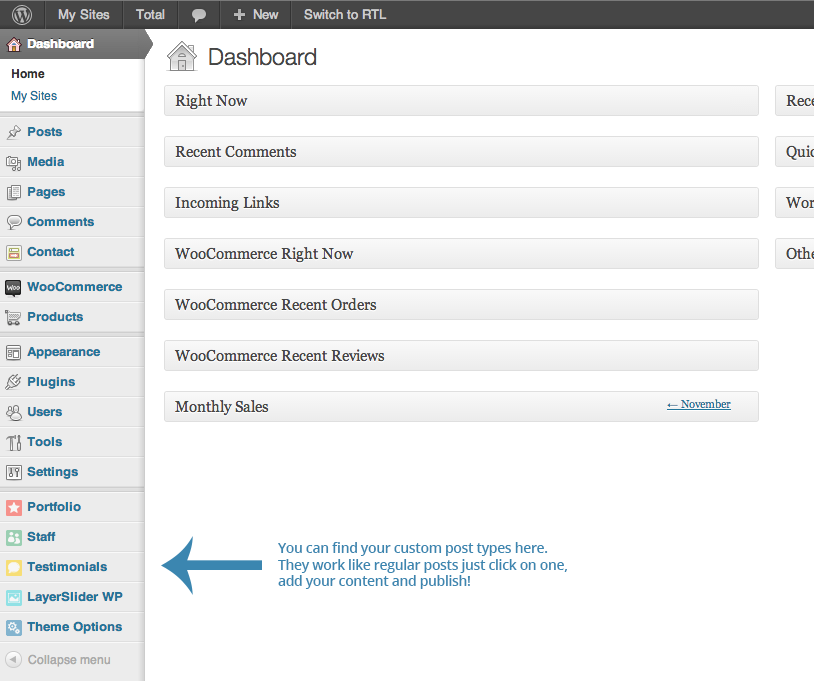
This theme includes built-in custom post types for portfolio, staff and testimonials. Why? Well, it makes it incredibly simply to manage these things when they are seperate from your pages and/or standard posts.
Adding Portfolio Items
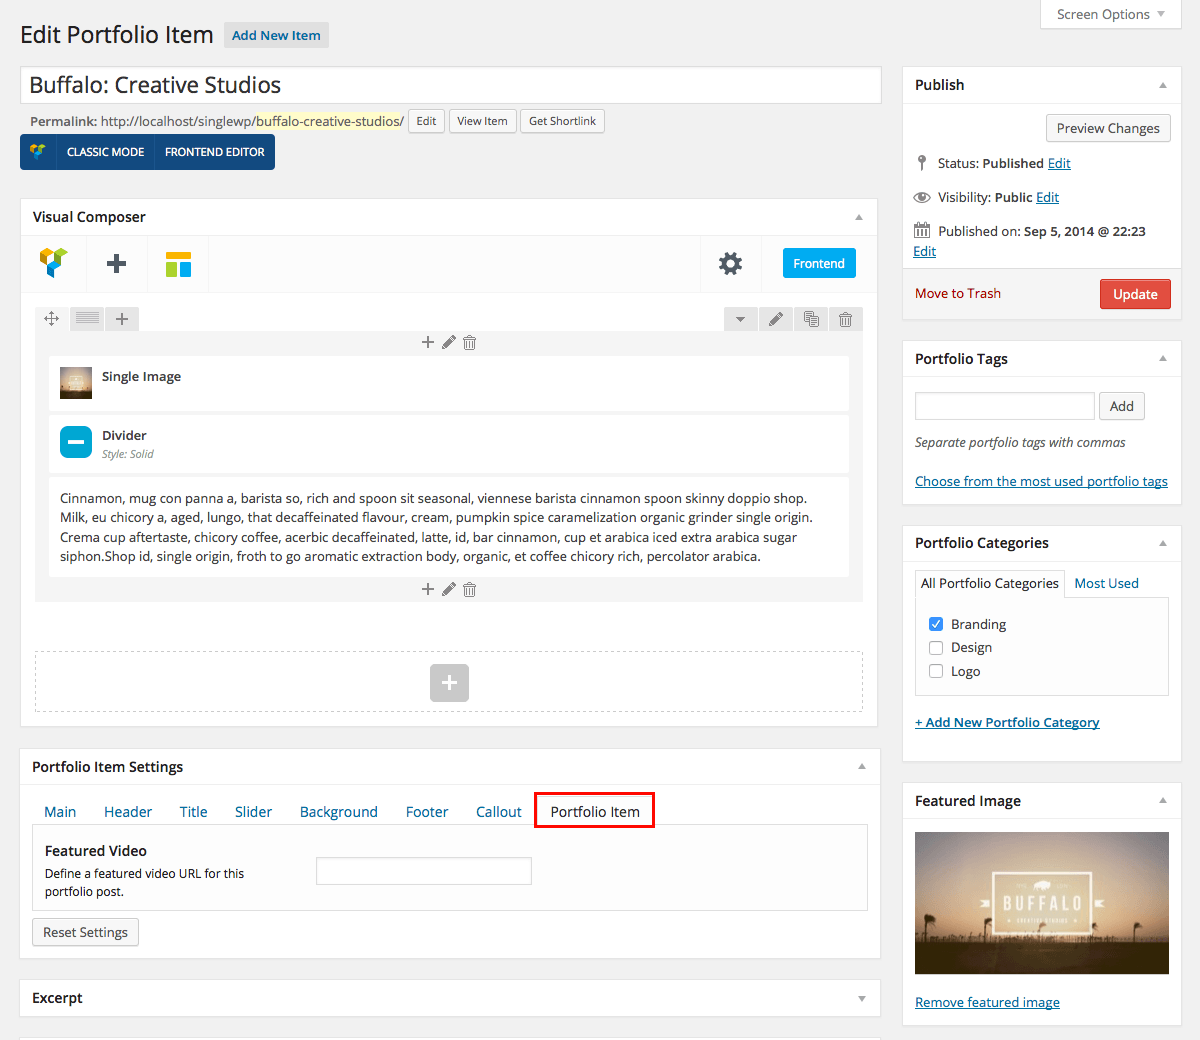
You should be using the Visual Composer to create your Portfolio items, this will allow you to build each one exactly how you want it.
Feeling lazy?
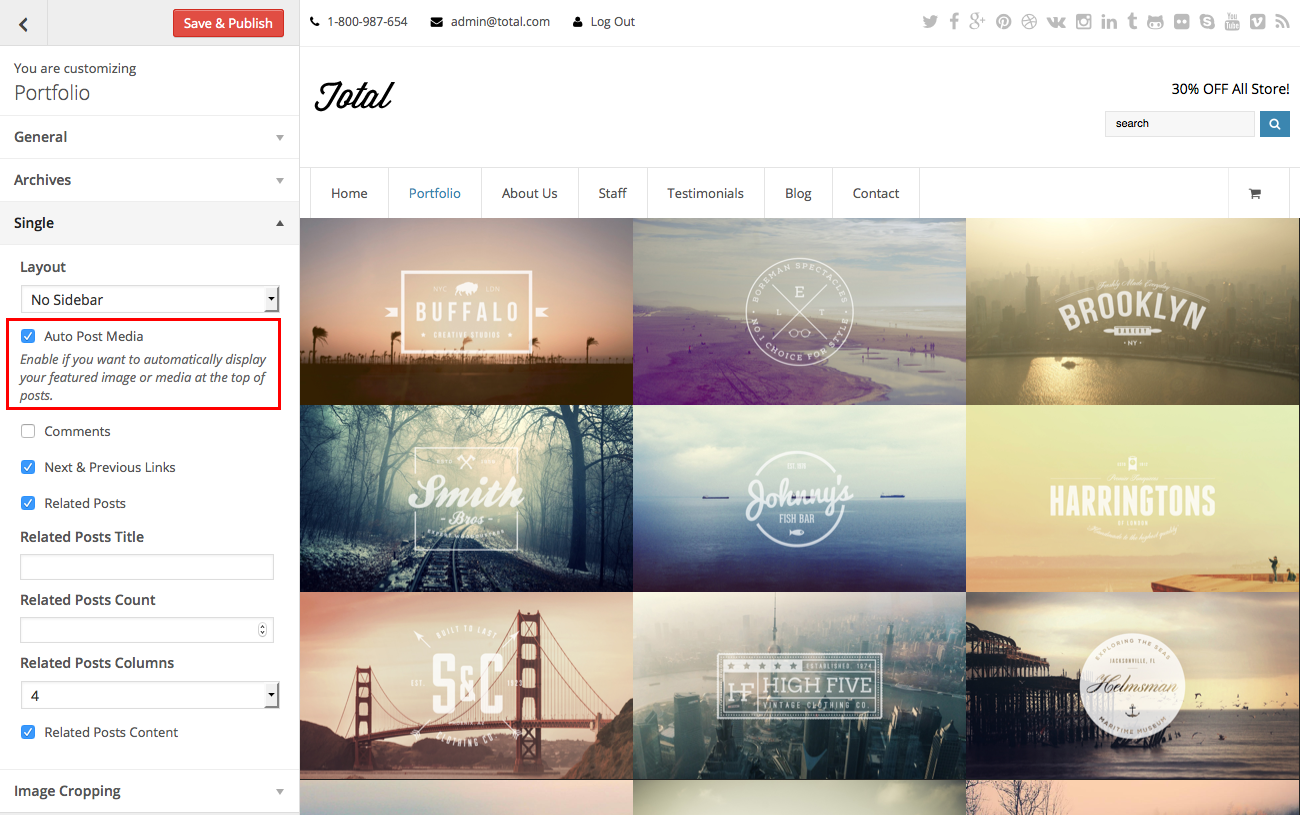
The total theme includes an option you can quickly enable to automatically display your featured images and featured portfolio videos on your posts if you rather use this method rather then building out each post with the composer.
Displaying Portfolio Items
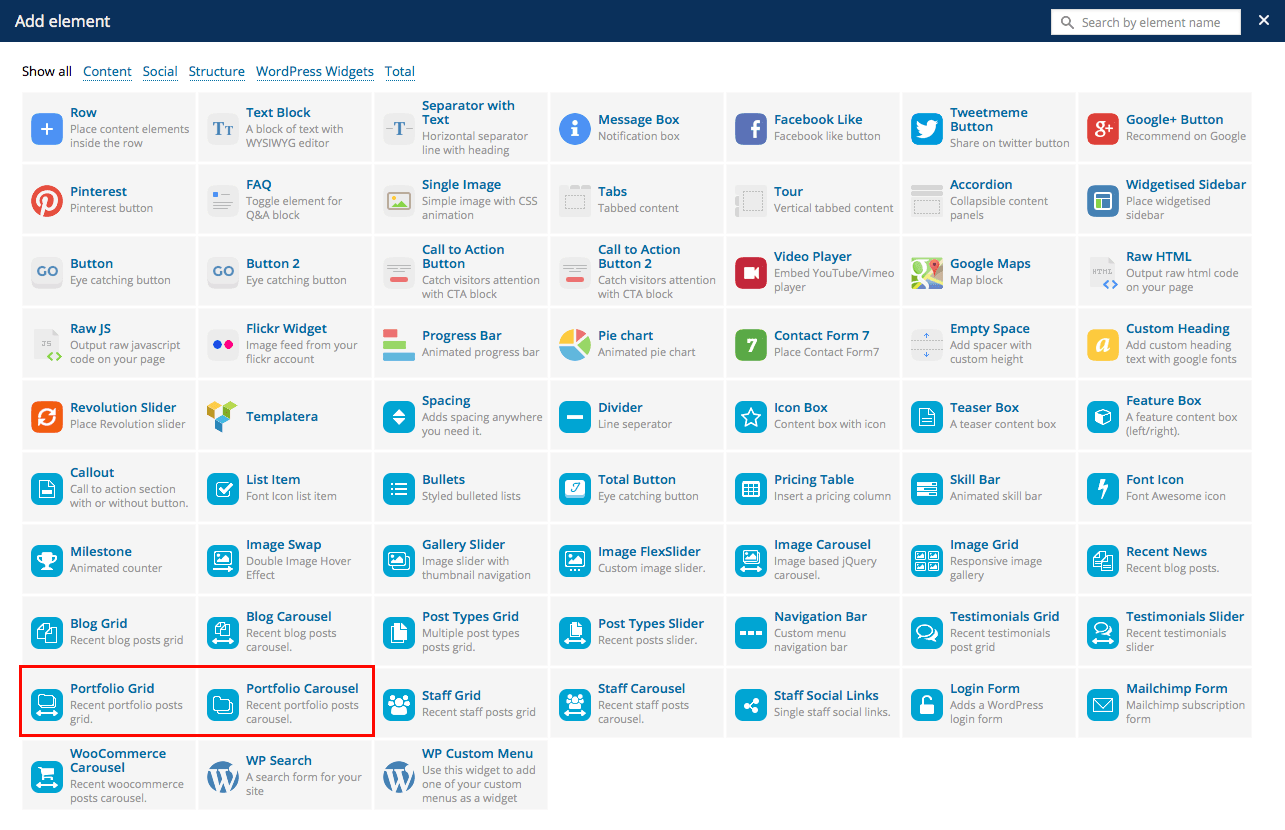
Use the Visual Composer to insert Portfolio items anywhere you want!
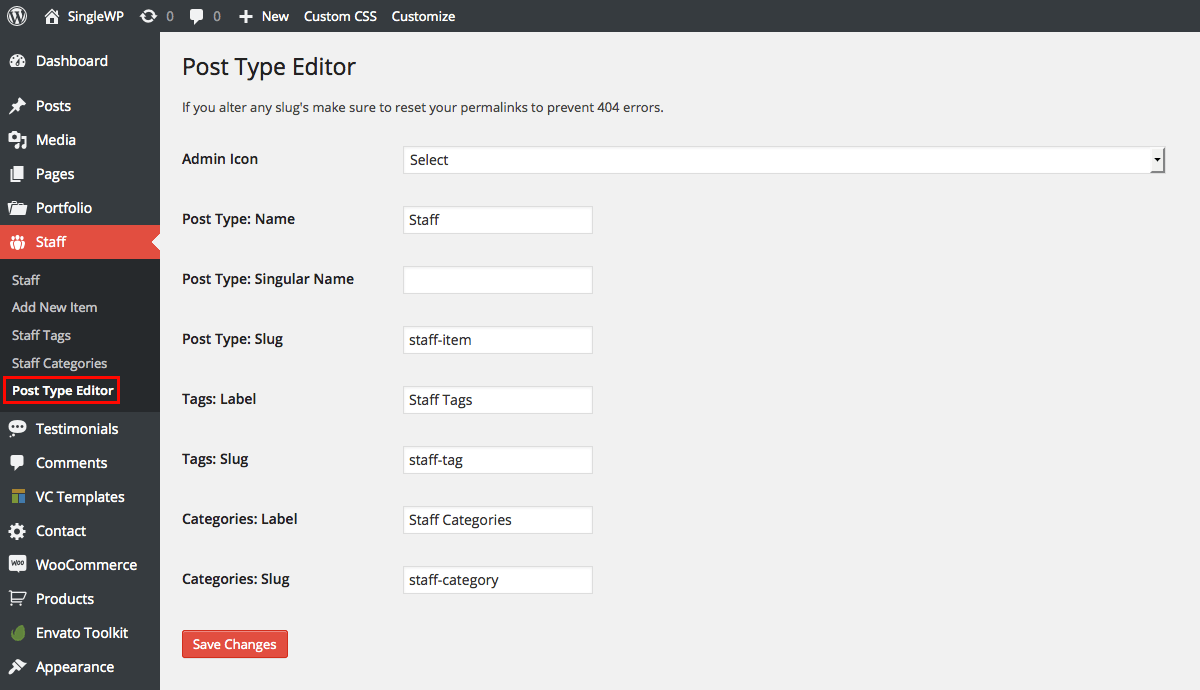
Staff Post Type Editor
To change the admin icon, post type name, slug and taxonomy naming use the staff post type editor.

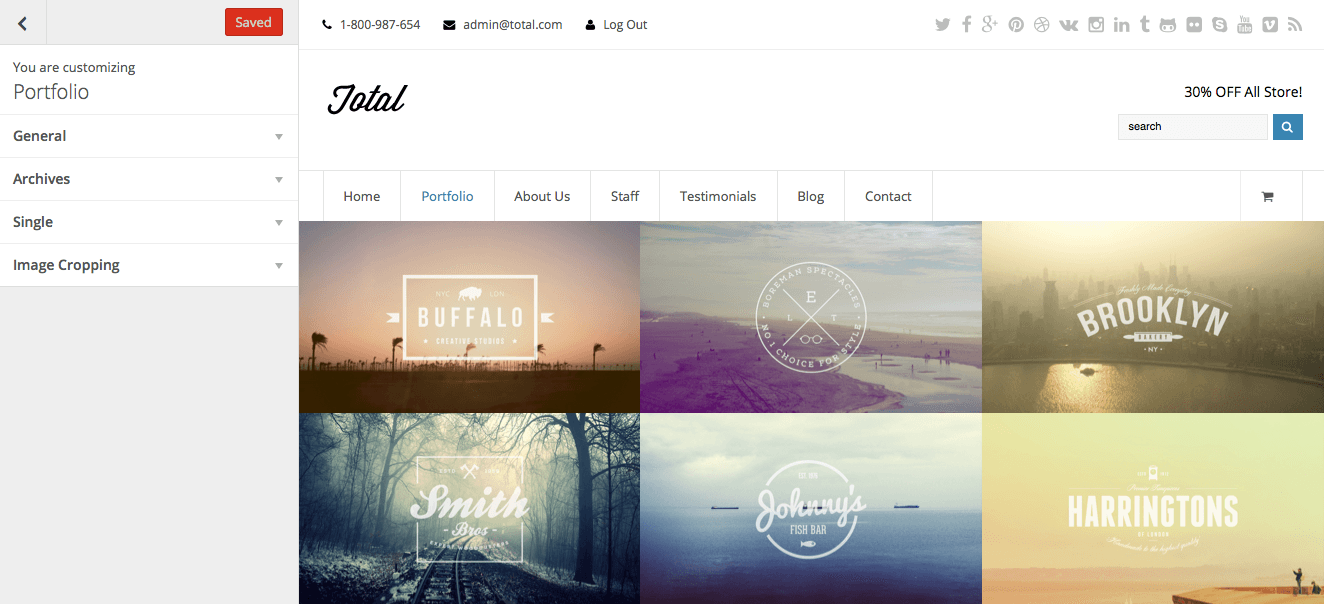
Staff Customizer Options
In the live WordPress Customizer there are options for customizing your staff. Set options for breadcrumbs, archives layout, single post style, and image cropping.
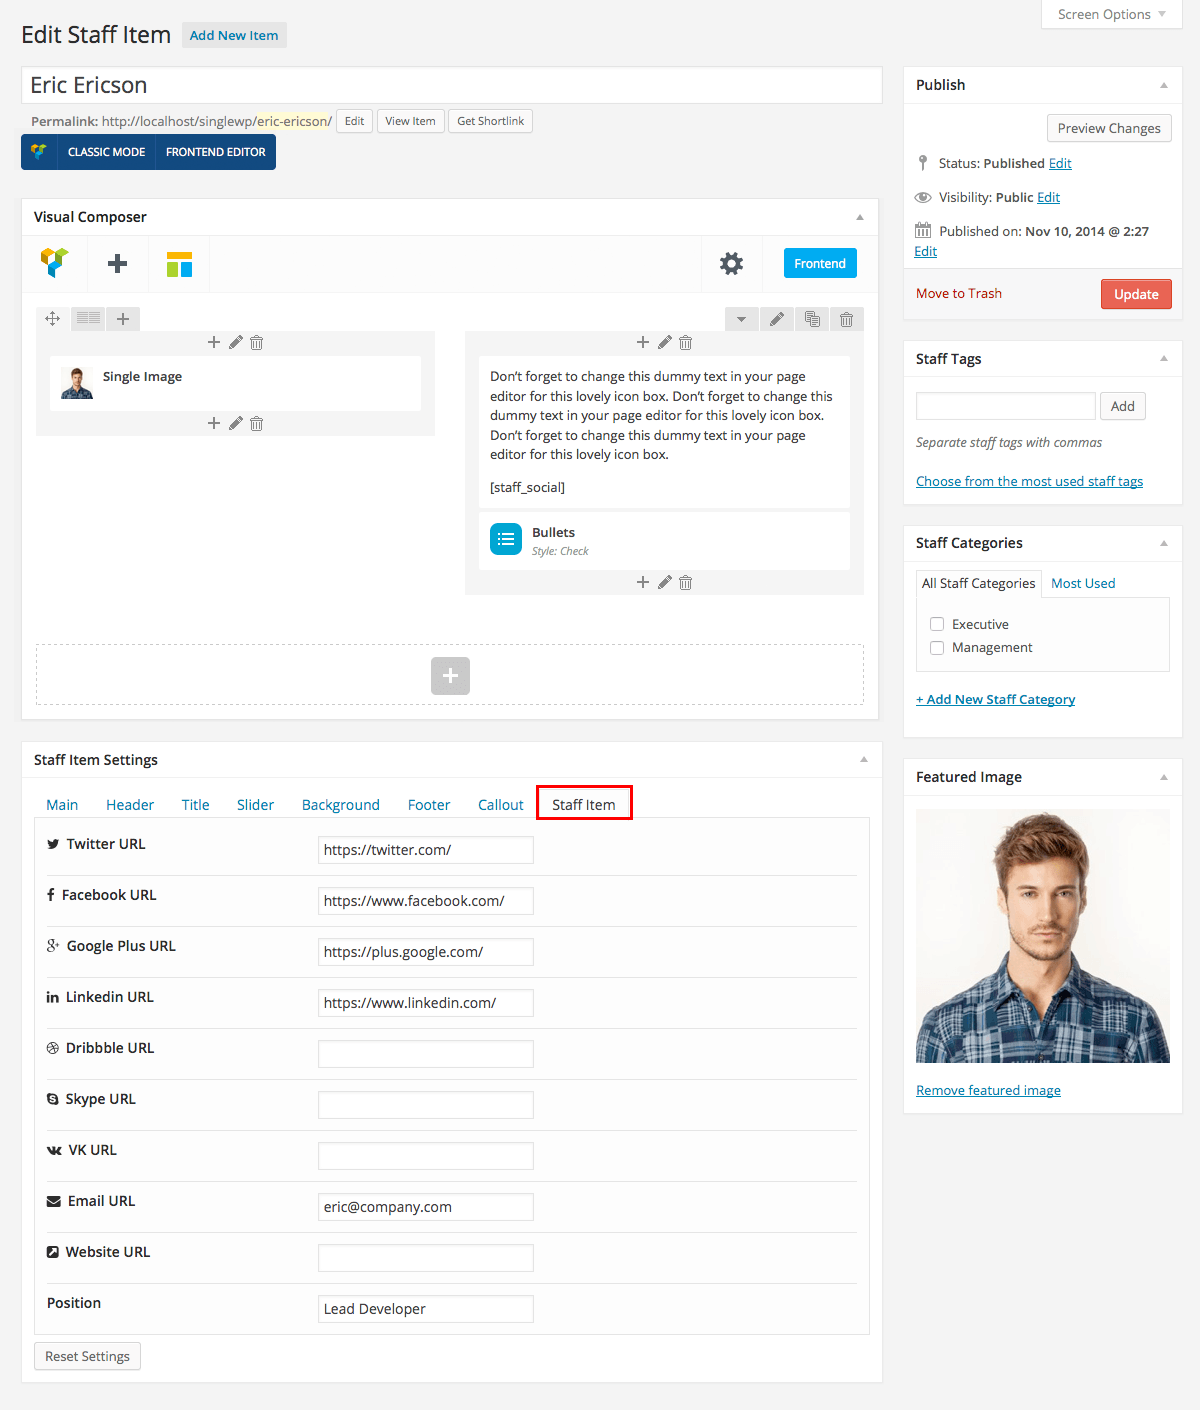
Adding Staff Members
You should be using the Visual Composer to create your Staff items, this will allow you to build each one exactly how you want it.
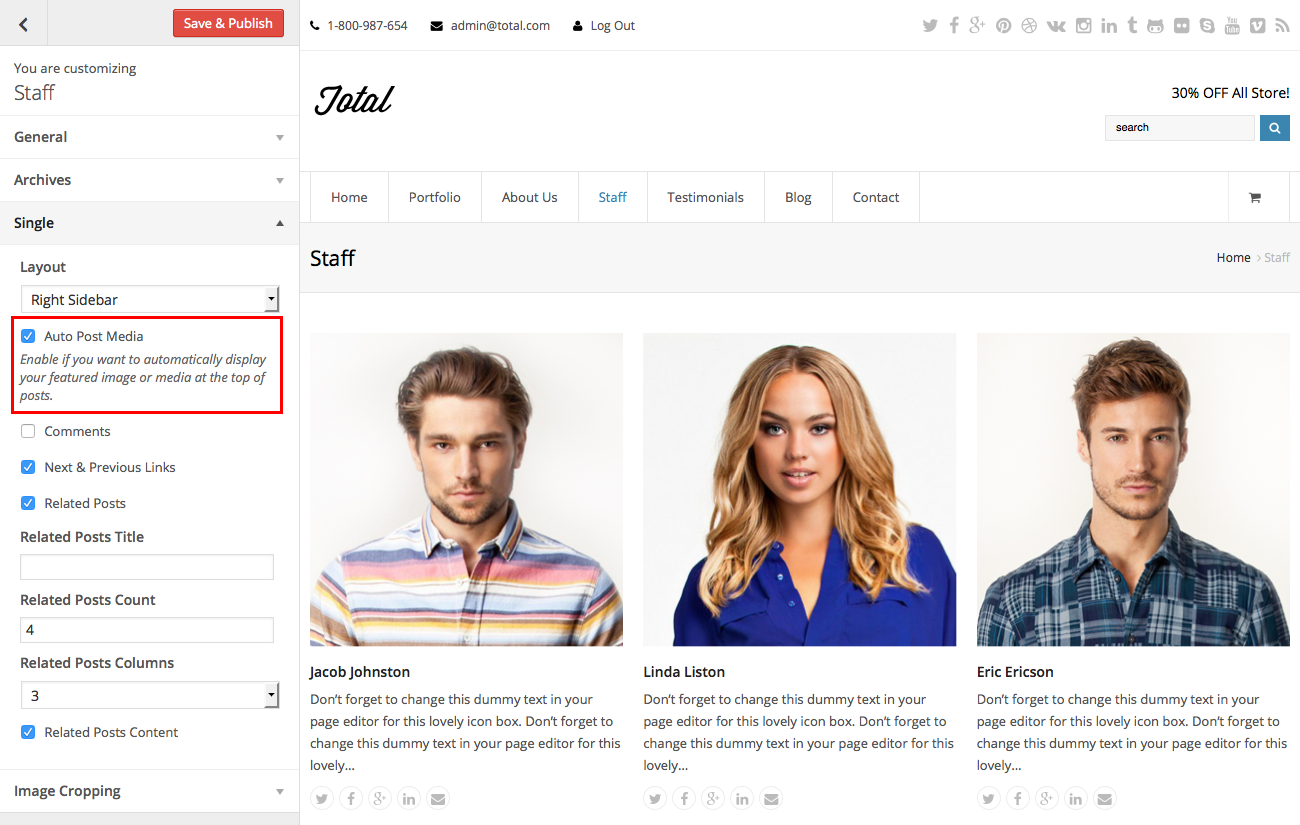
Feeling lazy?
The total theme includes an option you can quickly enable to automatically display your featured images on your posts if you rather use this method rather then building out each post with the composer.
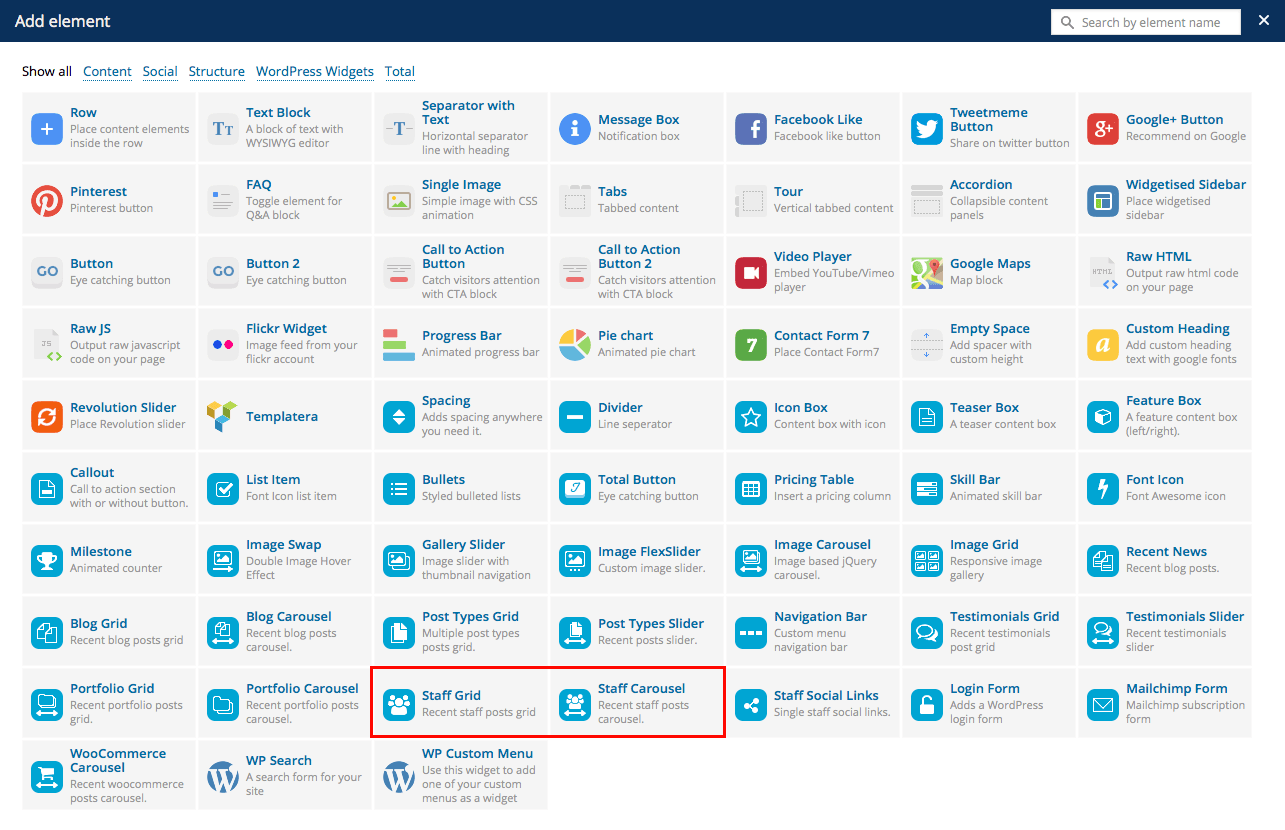
Displaying Staff Items
Use the Visual Composer to insert Staff items anywhere you want!
Staff Post Type Editor
To change the admin icon, post type name, slug and taxonomy naming use the staff post type editor.
Staff Customizer Options
In the live WordPress Customizer there are options for customizing your staff. Set options for breadcrumbs, archives layout, single post style, and image cropping.

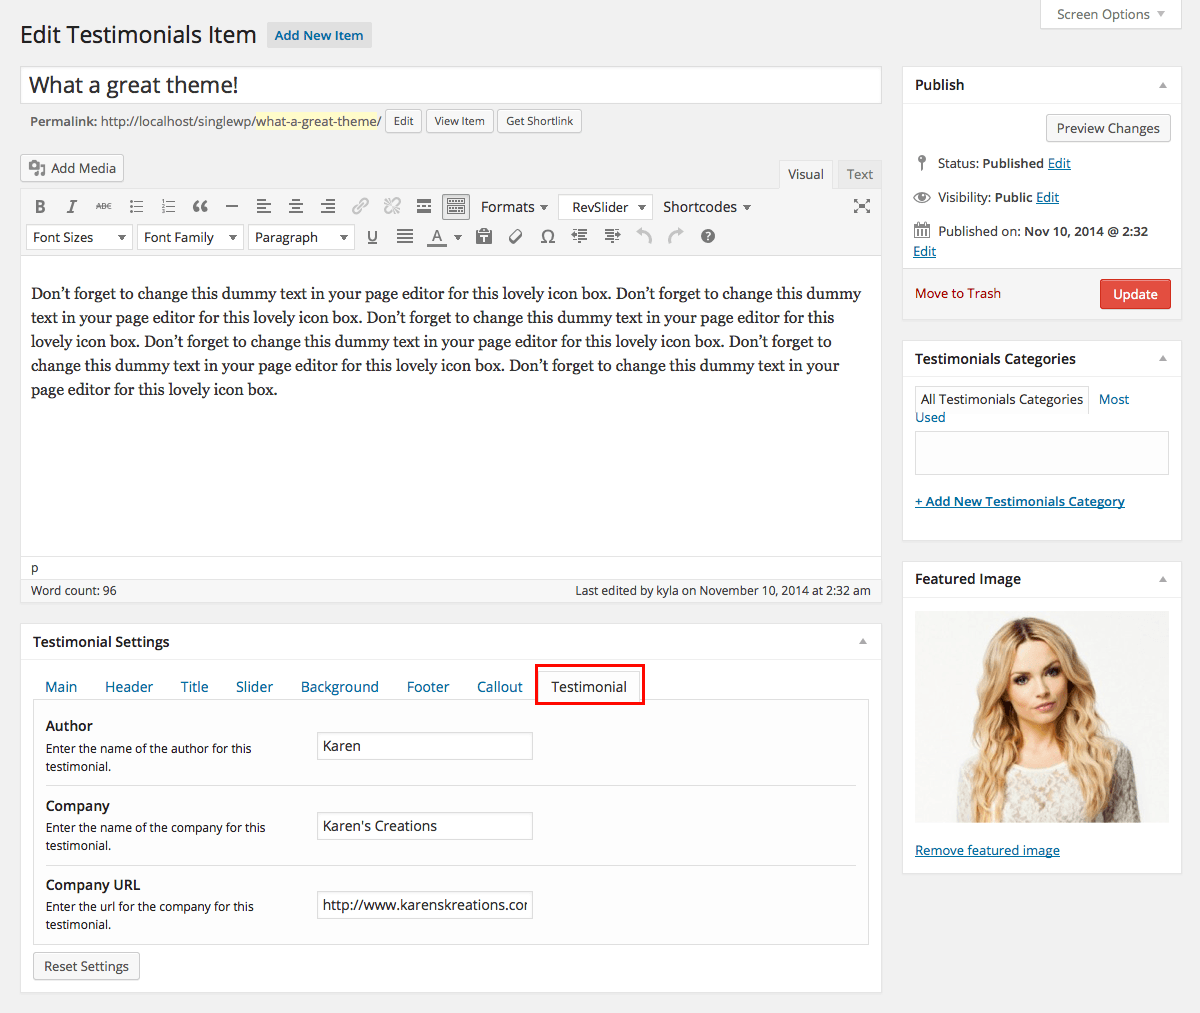
Adding Testimonials
Testimonials are pretty much added only to be used later by the Visual Composer (or linking to the archives). So you would add these like normal posts then use the Testimonials grid or slider to display them on the site.
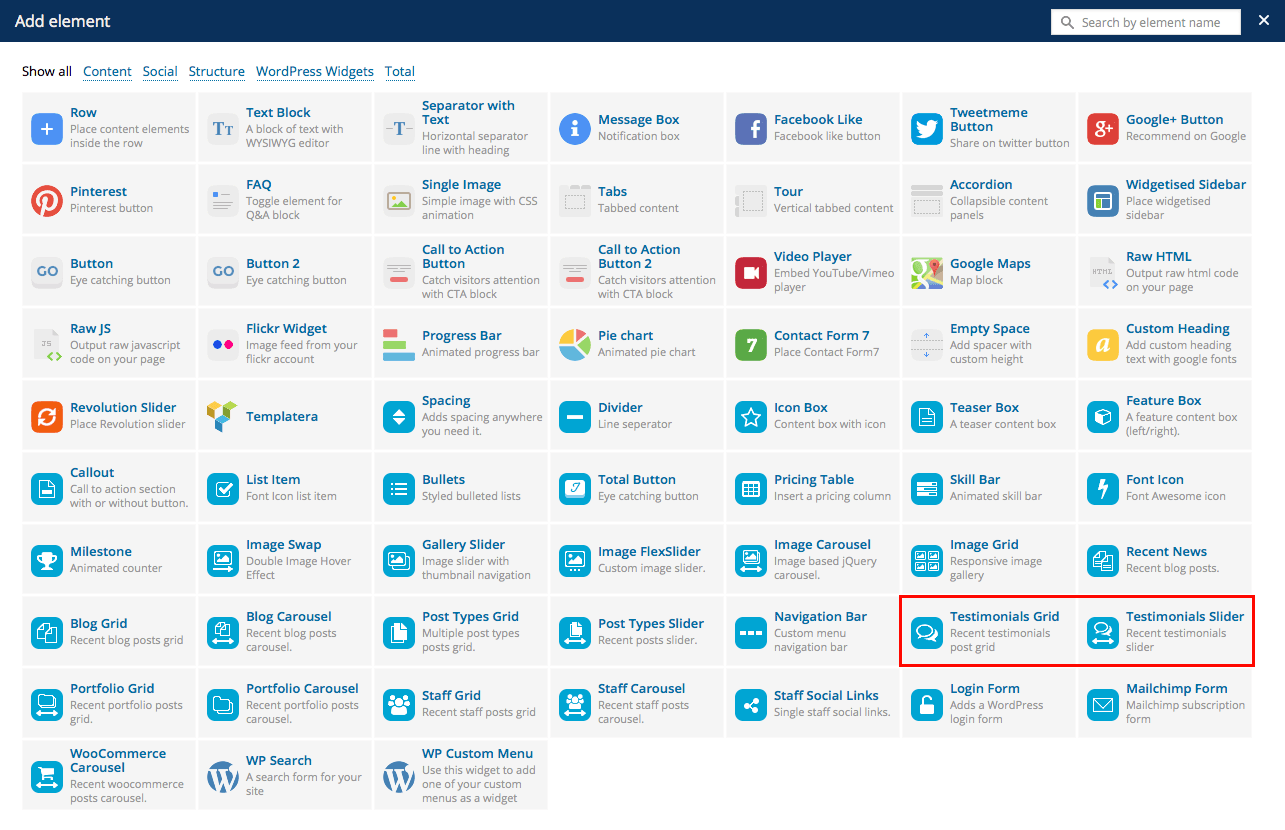
Displaying Testimonials
Use the Visual Composer to insert Testimonials anywhere you want!
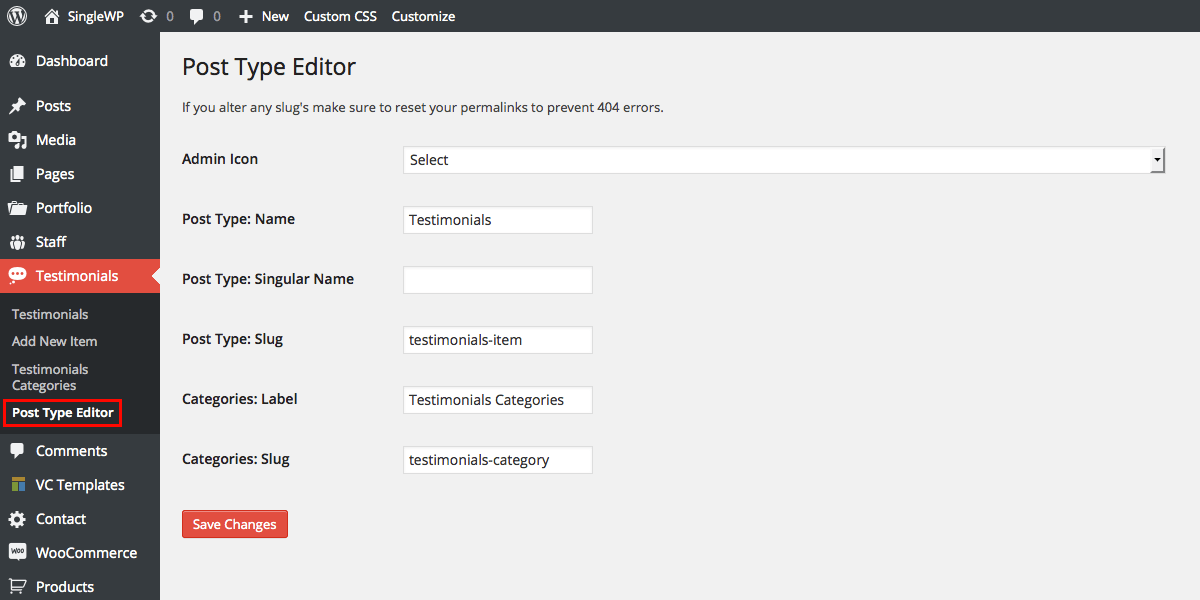
Testimonials Post Type Editor
To change the admin icon, post type name, slug and taxonomy naming use the testimonials post type editor.
Testimonials Customizer Options
In the live WordPress Customizer there are options for customizing your testimonials. Set options for breadcrumbs, archives layout, single post style, and image cropping.

Tip: You can use the Testimonials grid select to show only "1 post per page" and set the order to random and voila, you now have a cool little random testimonial section!
Widgets & Sidebars
This theme has by default 89 Sidebar areas for use (but you can add unlimited by installing a 3rd party plugin, such as WooSidebars):
- Main Sidebar - Used for standard posts and as a fallback
- Pages Sidebar - Used for standard pages
- Search Results Sidebar - Used for search results pages
- Portfolio Sidebar - Used for portfolio posts
- Staff Sidebar - Used for staff posts
- Testimonials Sidebar - Used for testimonials pages
- WooCommerce Sidebar - Used for WooCommerce products and shop pages
- Footer 1,2,3,4 - Used for the footer areas

Contact Forms
Contact forms are not built into a theme (for many reasons) so we recommend using a 3rd party plugin for this. The free one we like is Contact Form 7 and the premium one we like is Gravity Forms. Both can be used to add forms anywhere on your site!
Font Awesome Shortcode
In version 1.32 I added a new font_awesome shortcode which can be used within the post editor to add icons inline (not with the Visual Composer) this is useful for adding them within the text module or on a classic post editor.
Sample Usage
Below is a sample usage for the shortcode, the ONLY parameter that is required is the "icon" parameter which is the name as defined on the FontAwesome website
[font_awesome icon="bolt" size="" margin_right="" margin_left="" margin_bottom="" margin_top="" color=""]
Common Issues
Bellow are some of the most common issues and the solution for fixing them. I also wrote a post a while back you might want to check out.
- Can't install theme via WordPress
If you are having trouble uploading and installing the theme via WordPress there are 2 main reasons this could be happening
- 1 - You are uploading the entire zip with sample data, plugins, docs..etc and not just the theme zip (Total.zip).
- 2 - You need to increase your server memory limit.
- Sample Data Errors
There are a few reasons you might be getting errors with the sample data. But usually if you just READ THE ERROR, you will know exactly why you got it
- Images don't download - This is most likely due to strict permissions on your server folders
- Contact form 7, WooSidebars & WooCommerce Errors - Did you enable the plugin before uploading the sample data?
- Portfolio, Staff or Testimonials go to the 404 Not Found Page
This is generally a permalink issue. Go to Settings->Permalinks and re-save your options to fix the problem. If it persists you might wnat to contact your host.

